As we all have heard that in December End 2013 MMX NewsCaster twitted that Micromax is planning to launch KitKat for its Selected Canvas Models in about Q2 of 2014.
Micromax is continuously loosing trust of the old users due to this update issue because even the other Indian Smartphone makers like Xolo and Karbonn has started providing KitKat updates.
As the May has just started there is only one month left for the quarter 2 to end, so we can assume that Micromax can announce KitKat till the end of this month.
Now the recent leak confirms that The Indian Manufacturer Micromax was found Testing Android 4.4.2 KikKat in its Canvas 4 A210 Smartphone.
On 7th of Aprol 2014 Micromax has uploaded official KitKat 4.4.2 for the Micromax Canvas 4 on the Moulnisky.com which is under this path :
Index of . / downloads / Micromax / 00_A Serie / A210 / SW Versions / V17_050414(Beta Testing password protected) /
It is seemed to be update package for MMX Canvas 4 which can be flashed easily by SP Tools, however the file was password protected but through this we can assume that KitKat in Canvas is not to far.
Before proceeding further please be sure that i will not be responsible for any damage caused to your device, however if your device gets bricked then i will help you in unbricking it.
Rooting Guide :-
Step 1 :- First of all Download the Rooting kit and Extract its content on your desktop.
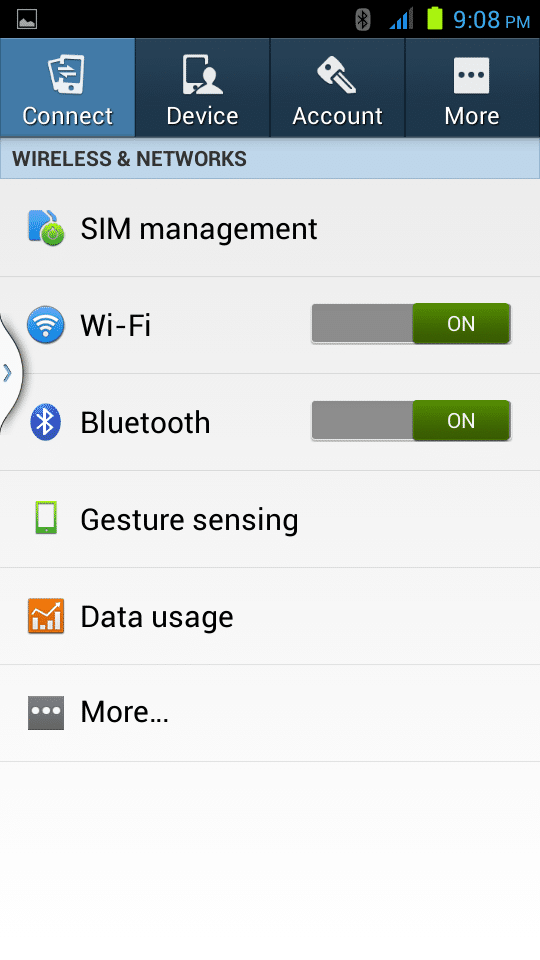
Step 2 :– Now Connect your device to PC in MTP Mode & USB Debugging Enabled Mode.
(Turn USB Debugging ON fby going to Settings>Developer Options>Enable USB Debugging )
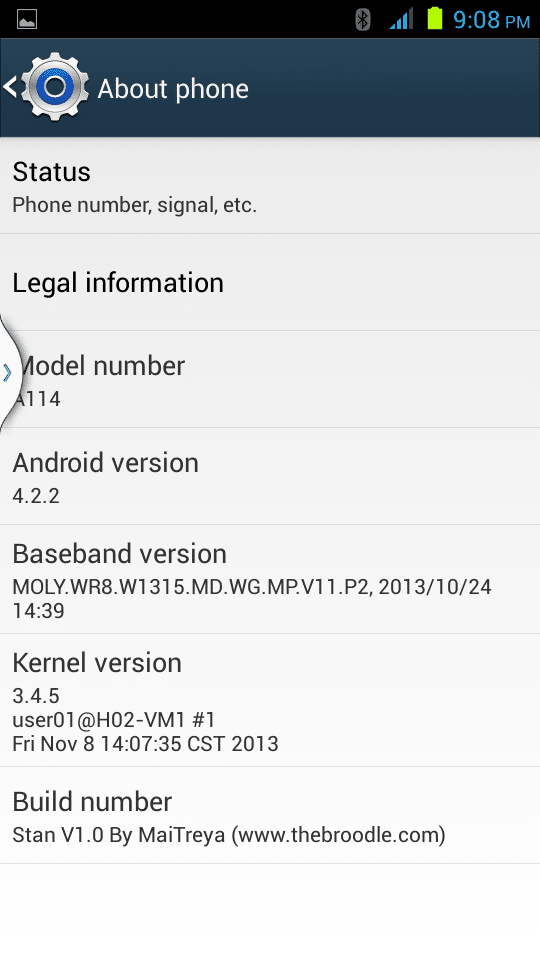
(If you are not seeing Developer Options in settings then Go to Settings>About Phone>Tap 7 times on build number until a toast is displayed “You are now a developer” to Show Developer Options in Settings)
Step 3 :– Now make sure that you have successfully install all Micromax Cnvas 4 USB Drivers on your PC.
Step 4 :- Now open the folder where you extracted Rooting Kit files and Double Click the RunMe.Bat file and wait for exploit.
Step 5 :- After clicking on RumMe,Bat file your device will restart automatically and after that you will find SuperSU app in your app drawer, it means that you are rooted.
Installing ClockWorkMod Recovery :-
Before proceeding further please make sure that you have rooted your device.
Step 1 :- Firstly Download CWM Recovery from the below link.
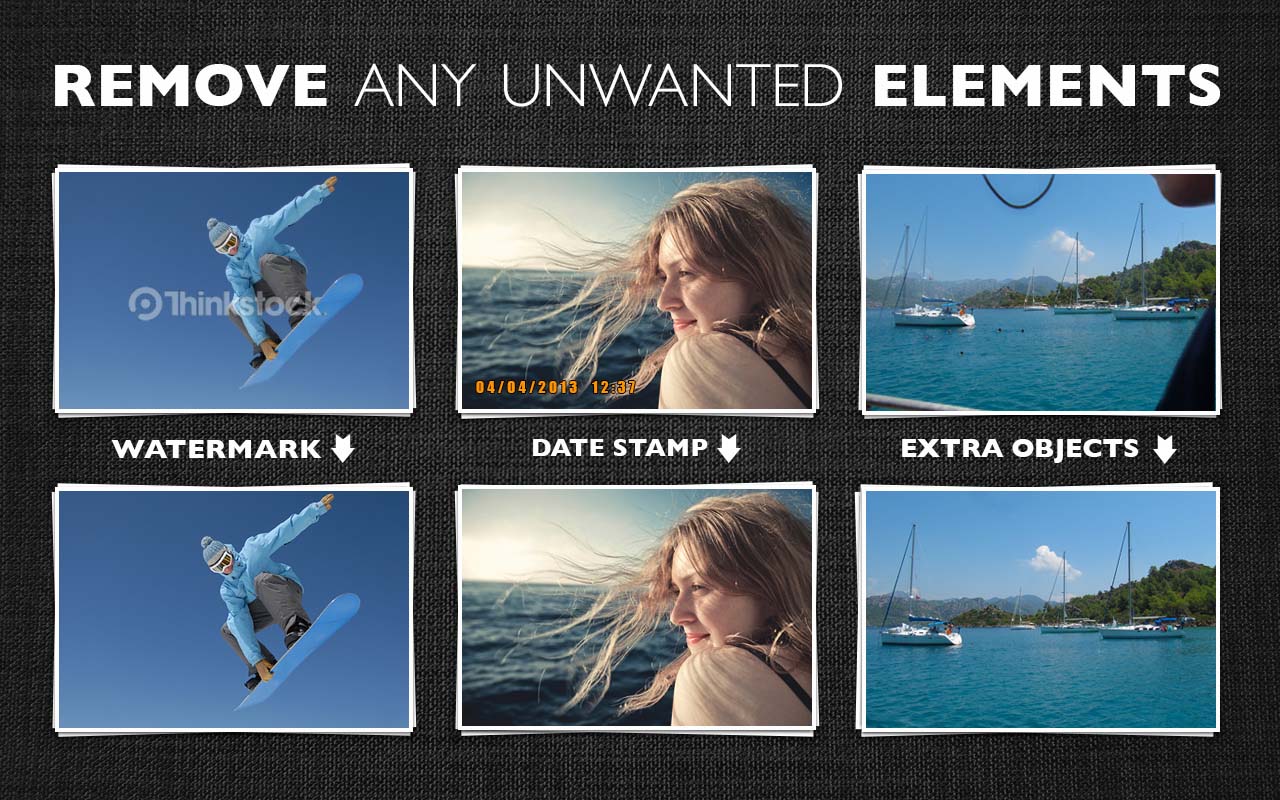
Many times we get our perfectly clicked shots all messed up because of some objects or due to some unnecessary tourists. Here, today I am going to show you a little tutorial through which you can easily remove unnecessary objects from your photos without any knowledge of Photoshop or any other Image Editing tool.
There are more tools to do this but today we are dealing with one of the best and free tool Inpaint. You can always outsource your photo editing to the services like FixThePhoto and receive professional objects removal for about $5 per photo.
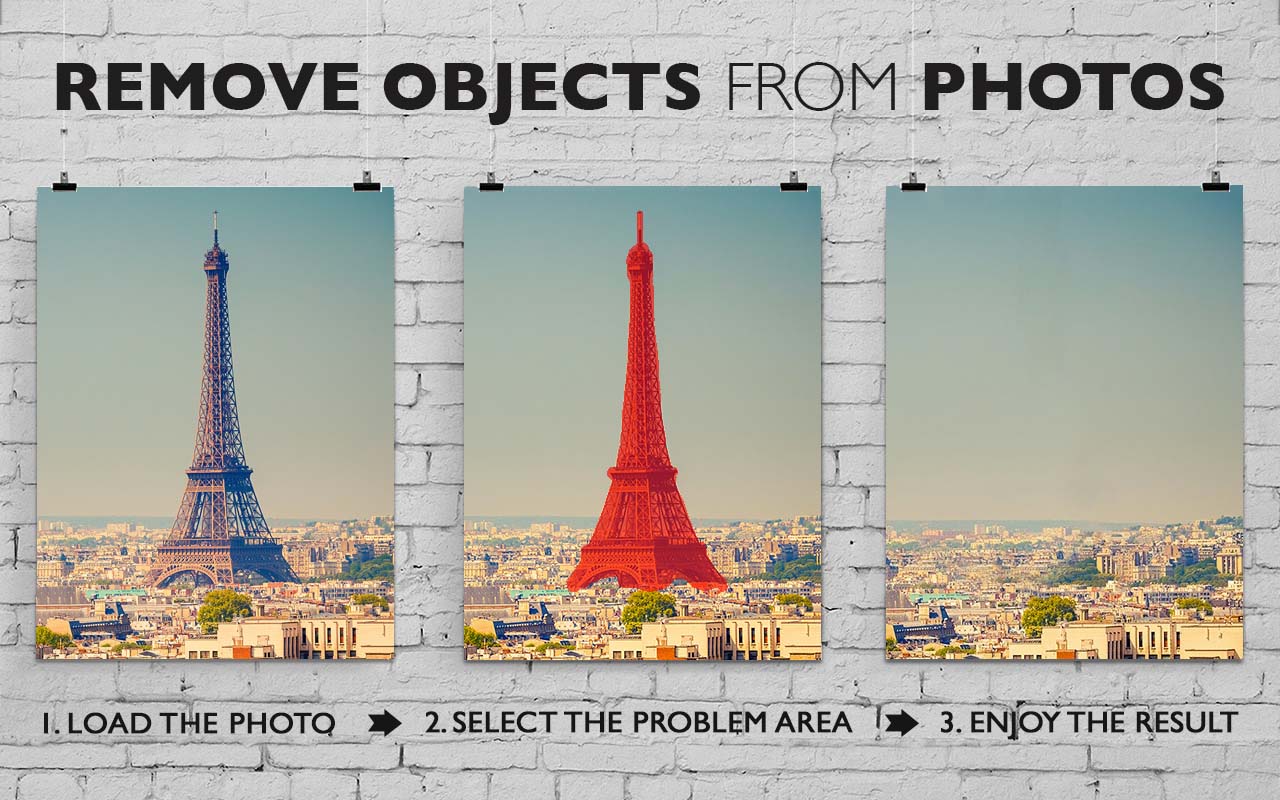
Inpaint will magically fill the selected area with intelligently-generated textures pulled from the surrounding image data. Go to our Tutorials page and see for yourself how easy it is for anyone to do with just a few simple steps
Remove Unnecessary objects from Photos
Remove Objects from photos
Features of Inpaint:-
Repair old photos
Remove watermarks
Delete unwanted people from a photo
Erasing wires and power lines
Remove unwanted objects
Digital Facial retouching
Remove date stamps
Erase wrinkles and skin blemishes
Remove tourists from travel photos
Fill black areas of a panorama
Remove text or logo from images
Remove moving objects from photos
Easy to get used & started
Completely non-technical
How Inpaint Works:-
Inpaint photo restoration software reconstructs the selected image area from the pixels near the area boundary. Remove undesirable objects from your images, such as logos, watermarks, power lines, people, text or any other undesired artifacts. There’s no need to manually go through messing around with your old clone tool any more! Now you can use Inpaint to easily remove all those unexpected objects that end up spoiling an otherwise really great photograph.
The Smartphone industry is growing at a rapid rate and almost every week a new smartphone is announced by the Manufacturers with many new improved features and that to keep ourselves updated with technology we Changes our Smartphones. Buying a new smartphone is easy but However, moving data like Contacts, Text Messages, Apps etc. from old phone to new one is never been an easy job specially when we shift from Android to iOS or vice versa, but no to solve this headache we have a Free tool named “WonderShare MobileTrans”
What is MobileTrans ?
WonderShare MobileTrans
MobileTrans is a Software Application capable of transferring all your data – including contacts, text messages, call logs, photos, music, videos and apps from One Phone to Another with no data loss.
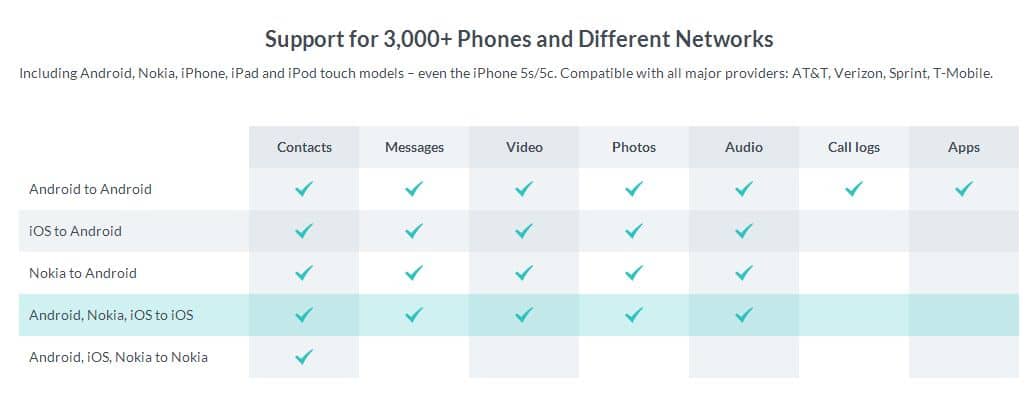
Currently MobileTrans Supports 3000+ Different phones including Mobiles Operating Systems like Android, Windows, iOS and Symbian.
What Type of Connections can be established with MobileTrans ?
MobileTrans can work on following Networks :-
Android to Android
Android to iOS
Android to Symbian
Android to PC
iOS to PC
iOS to Android
iOS to iOS
iOS to Symbian
Symbian to PC
Symbian to Android
Symbian to Symbian
Symbian to iOS
Transferring Data from one OS to Another
Downloading links :-
MobileTrans is Capable with both Windows and Mac PC.
Step 1 :- Firstly download and install Wondershare MobileTrans on your computer.
Step 2 :- Now start the software on the computer and connect two mobile phones to the computer using USB cable and make sure that you have installed proper Drivers for your Mobile Devices.
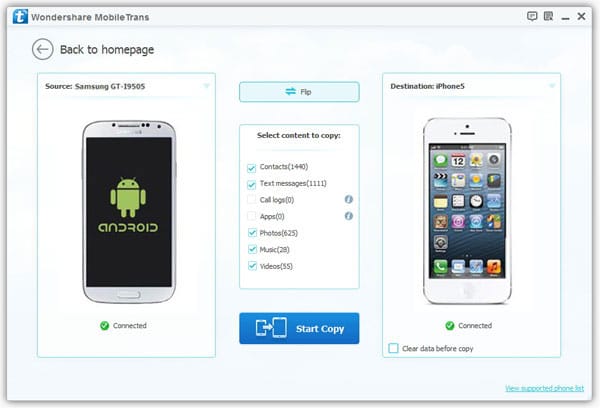
Step 3 :- The software will automatically detect the mobile phones and will show which content can be transferred from one to another.
Step 4 :- Select the content which you want to transfer to the new phone.
Transferring Data from Android to iOS
Step 5 :- Once the selection is complete, hit the “Start Copy” button to start the transfer process. Now sit back and relax.
Wondershare MobileTrans will move all data from source to destination phone. It will take some time depending on the amount of data selected.
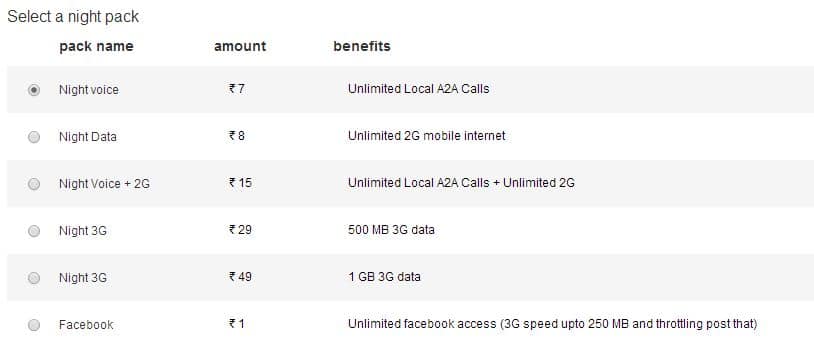
A few days before Bharti Airtel launched Night Store for its Prepaid Subscribers. The Night Store includes various Unlimited 2G and 3G Data and Voice Packs.
The Airtel Night Store include these Packs :-
Airtel Night Store Packs
You can Activate these packs all by yourself by deducting balance from your connection.
How to Activate Night Store Packs :-
To avail Night Sore offers dial *129# or call at 129 and select your desired plan or you can also activate them from their site.
Note :- Use this method only when you have requested PIN for 3 times and haven’t received it within 4 weeks.
Google Adsense is one of the Most Popular and Most Reliable Advertisement Network which works on CPC (Cost Per Click) algorithm and provide one of the best advertising platform for Publishers and Bloggers.
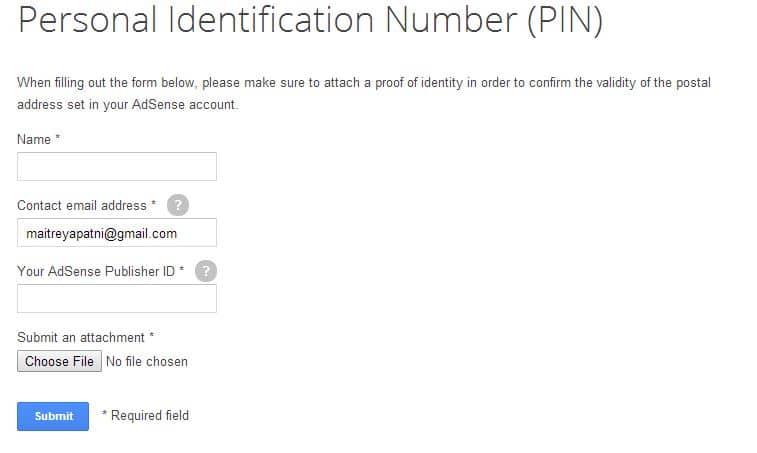
Google Asks for Address proof when you have earned $10 or more, for that you need to give google your Postal Address and Google Sends a Postcard with PIN in it to Verify, but in many countries Post Service is terrible as it takes more then a month to receive Postcard, in that case you can use this guide to verify your address without receiving PIN and verify it with ID Proof.
This guide is 100% Genuine and is provided by Google itself and will not cause any harm to your Adsense Account.
You can use any kind of Government Identity Card for Verification but that IS Should Contain your Address.
You may use Driving License, Voter ID Card, Bank Statement or Electricity and Telephone Bills etc.
According to Google Adsense Help, you can only send a copy of your official identity document or domestic bill only if you’ve requested your maximum of 3 PINs and haven’t received any of them within 4 weeks of your last PIN request but I verified my Adsense via my Driver’s license few days after requesting for the second PIN.
Now Fill and submit the form with your Name, Gmail Address, Associated AdSense Publisher ID, and a proof of identity document, and click on Submit Button.
Address Verification in Google Adsense without PIN
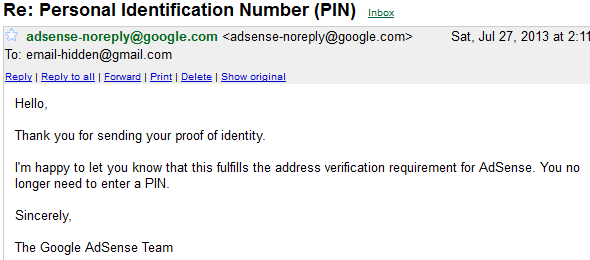
In few hours after submission you will receive an email from Google Adsense saying that you have successfully verified your Address in Google Adsense Account.
A Snapshot of Email that i received is posted below :-
If you are a gamer then you probably have heard about the Valve’s “Steam” OS – An Operating System designed specially for Gamers. Steam OS is a Linux based Operating System designed for people who wanted to enjoy High End Graphic Games in their PC.
The installation process is pretty easy if you follow the steps as i do. So, lets begin installing Steam OS.
System Requirements for Steam OS :-
Windows XP, Vista, or 7
512 MB RAM
1 Ghz or faster processor
Intel Mac, OS X version Leopard 10.5.8, Snow Leopard 10.6.3, or later.
Two-button mouse strongly recommended
1GB HD space (recommended)
Internet connection (broadband recommended)
Downloads :-
Before installing you need to download some files and softwares, so download them from the below links :-
Follow this step by step Installation Guide for installing on Virtual Box.
Step 1 :– After downloading Both of the above files, Install Virtual Box on your PC and run it from desktop.
Step 2 :-On the next screen you will get Virtual Box Main Screen, Click on “New” Blue colored button from the top left side on the screen.
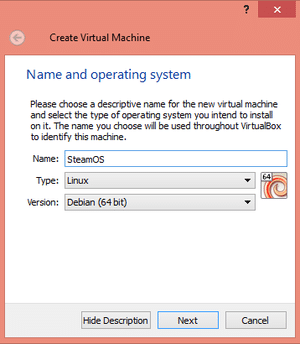
Step 3 :– On the first screen, you will be asked pick a name for your system and to choose what type of operating system it will run. Pick whatever you want for a name, and choose Linux from the type dropdown menu and Debian (64 bit) from the version list.
Setting up Steam OS in Virtual Box
Step 4 :– On the next screen you’ll choose how much of your system memory the virtual computer will use while running. Choose less than half of your total system memory—one or two gigabytes should be fine.
Step 5 :- Next you’ll be asked about a hard drive. Choose to create one now, and then on the next screen, leave the first option (VDI) selected, and click Next.
Step 6 :- On the next screen, leave the Dynamically Allocated box checked and hit Next again. Finally, you’ll be asked to pick a size for your virtual machine’s hard drive. Note that you won’t actually be giving up all this hard drive space right away—the dynamic allocation option you selected earlier means that virtual hard drive space is only created as you actually use it. The amount you specify here is just the maximum amount the virtual machine will ever be allowed to use. So go ahead and pick a fairly large value, such as 40 or 50GB. (it may be less depending on your system hd space)
Step 7 :-With that, your virtual SteamOS machine is created—you can see it in the column on the left side of VirtualBox, Now Select it and click on “Start” Button to Start it.
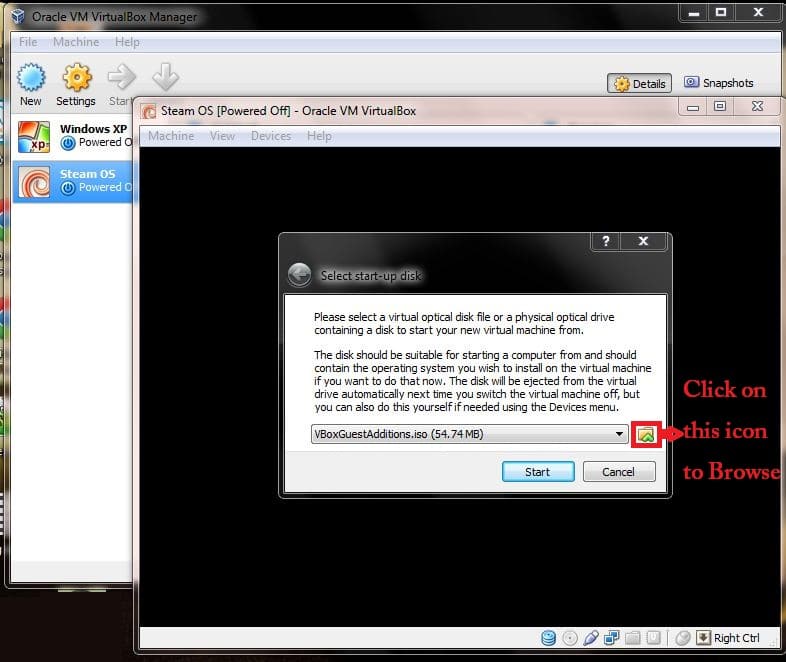
Step 8 :- After clicking on Start button it will ask for start up disk, to install the OS, just browse the iso file that you downloaded by clicking on the folder icon next to drop down list and click on start button.
Installing Steam OS in Virtual Box using Bootable ISO
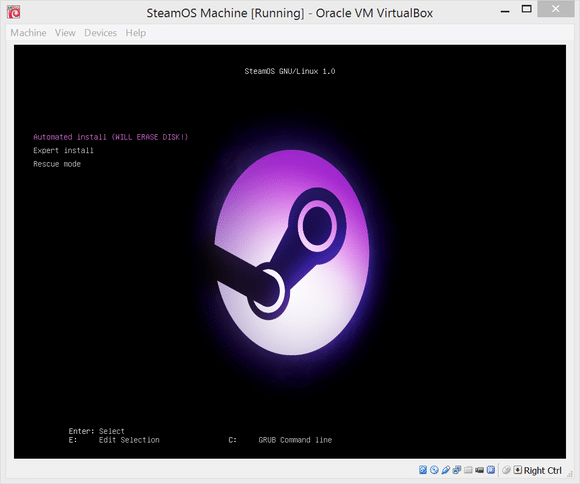
Step 9 :- After clicking on start button you will see that Steam OS is Starting and within few minutes you will get start screen which shows Installation options.
Installing Steam OS
Step 10 :- Now Click on Automatic Install and follow on screen options. That’s it, you will get your Steam OS Installed withing few minutes. For Step by Step guide after Step 10 visit this link.
Google has just released an update for its Stock Camera App which comes pre installed in Nexus and Google Play Edition Devices, with this update Google has also made it available for another devices on through Google Play Store.
Currently Play Store Version of this app only supports Android 4.4 KitKat Devices but if you are a Jelly Bean user then you can also install its Modded version from here :- Google Camera App Port for Jelly Bean Devices
The new version of Google Camera has included various new features like refreshed UI but one of the most awaited and awesome feature of that is Lens Blur which was commonly Found in Nokia Lumia Camera Apps.
Google Camera Vs Nokia Camera :-
Features :-
Google Camera
Nokia Camera
Lens Blur
Nokia Refocus
Photo Sphere
Panorama
HD Video Recording
HD Video Recording
HDR and SLR
HDR and Location Services
Google Lens Blur VS Nokia Refocus :-
Let’s see which Platform Performs Better while manipulating the focus.
We tested Lens Blur on Moto G and Moto X and Refocus on Nokia Luma 920 and here are the results :-
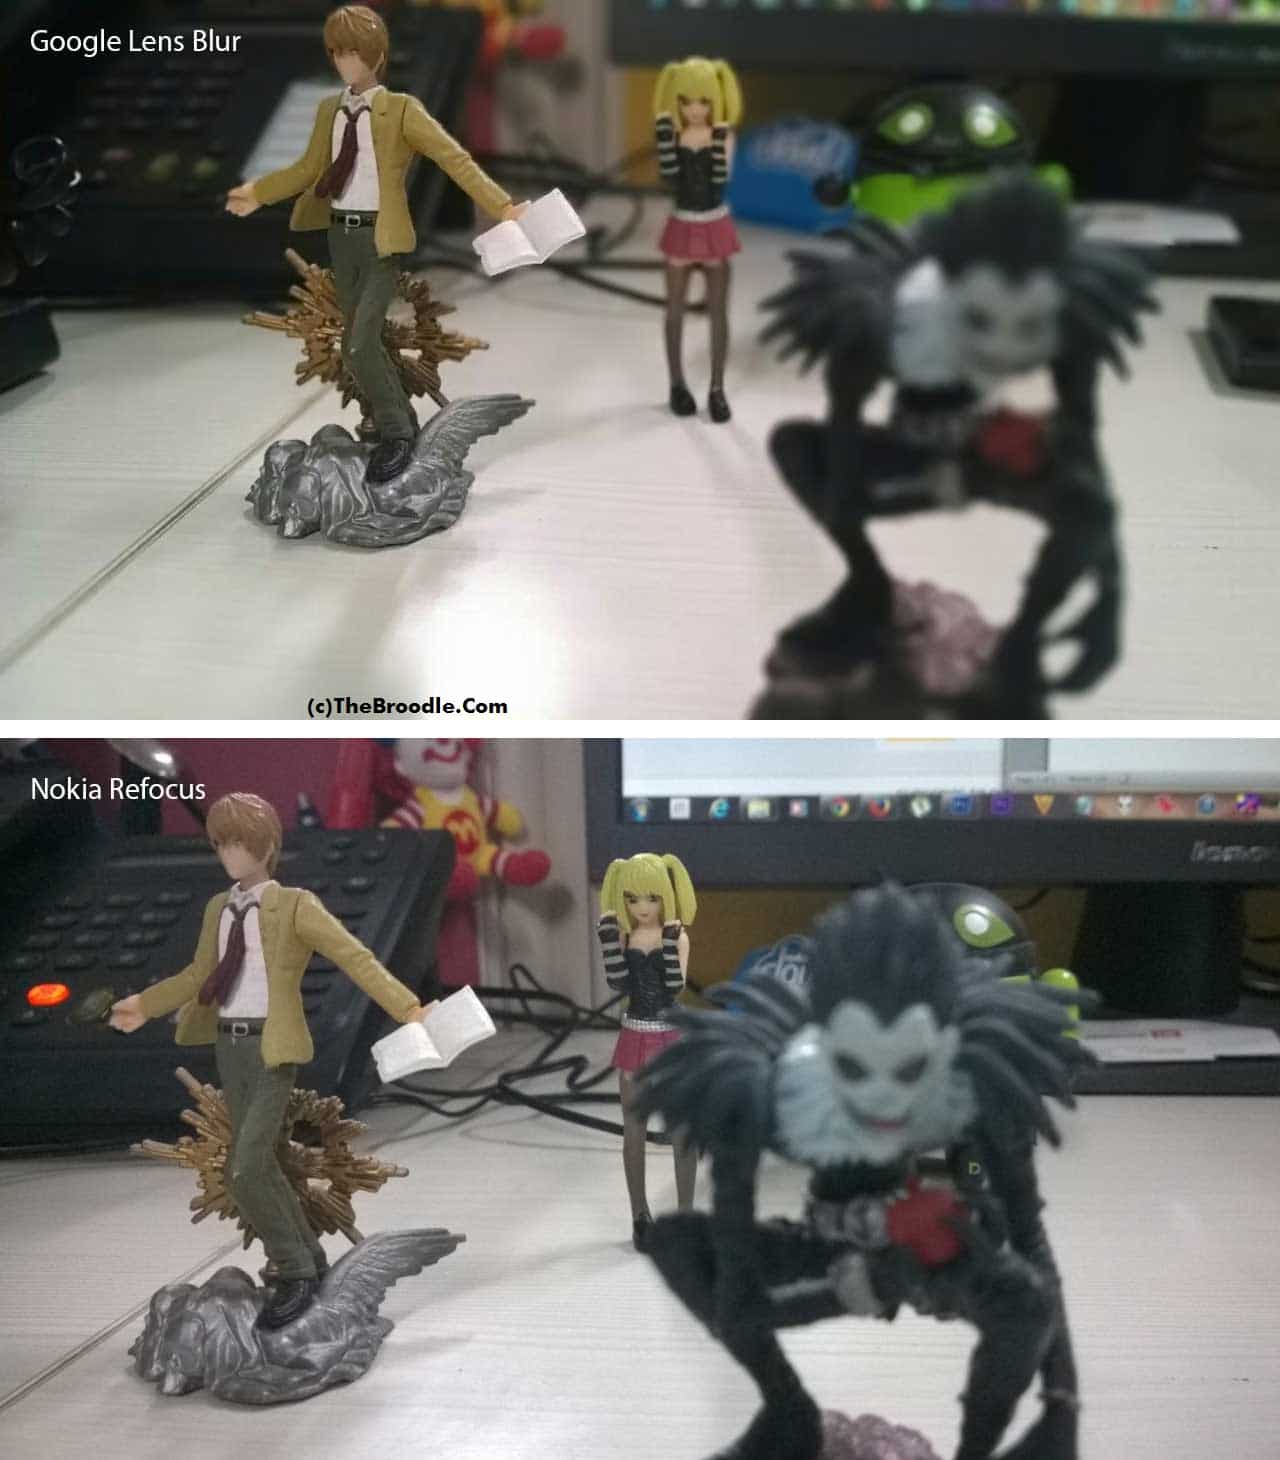
Google Lens Blur Vs Nokia Refocus
Here Google Camera App scores well only because we manually focused on the subject. Without that, it’s tough to get a clear picture with multiple subjects.
Google Lens Blur and Nokia Refocus
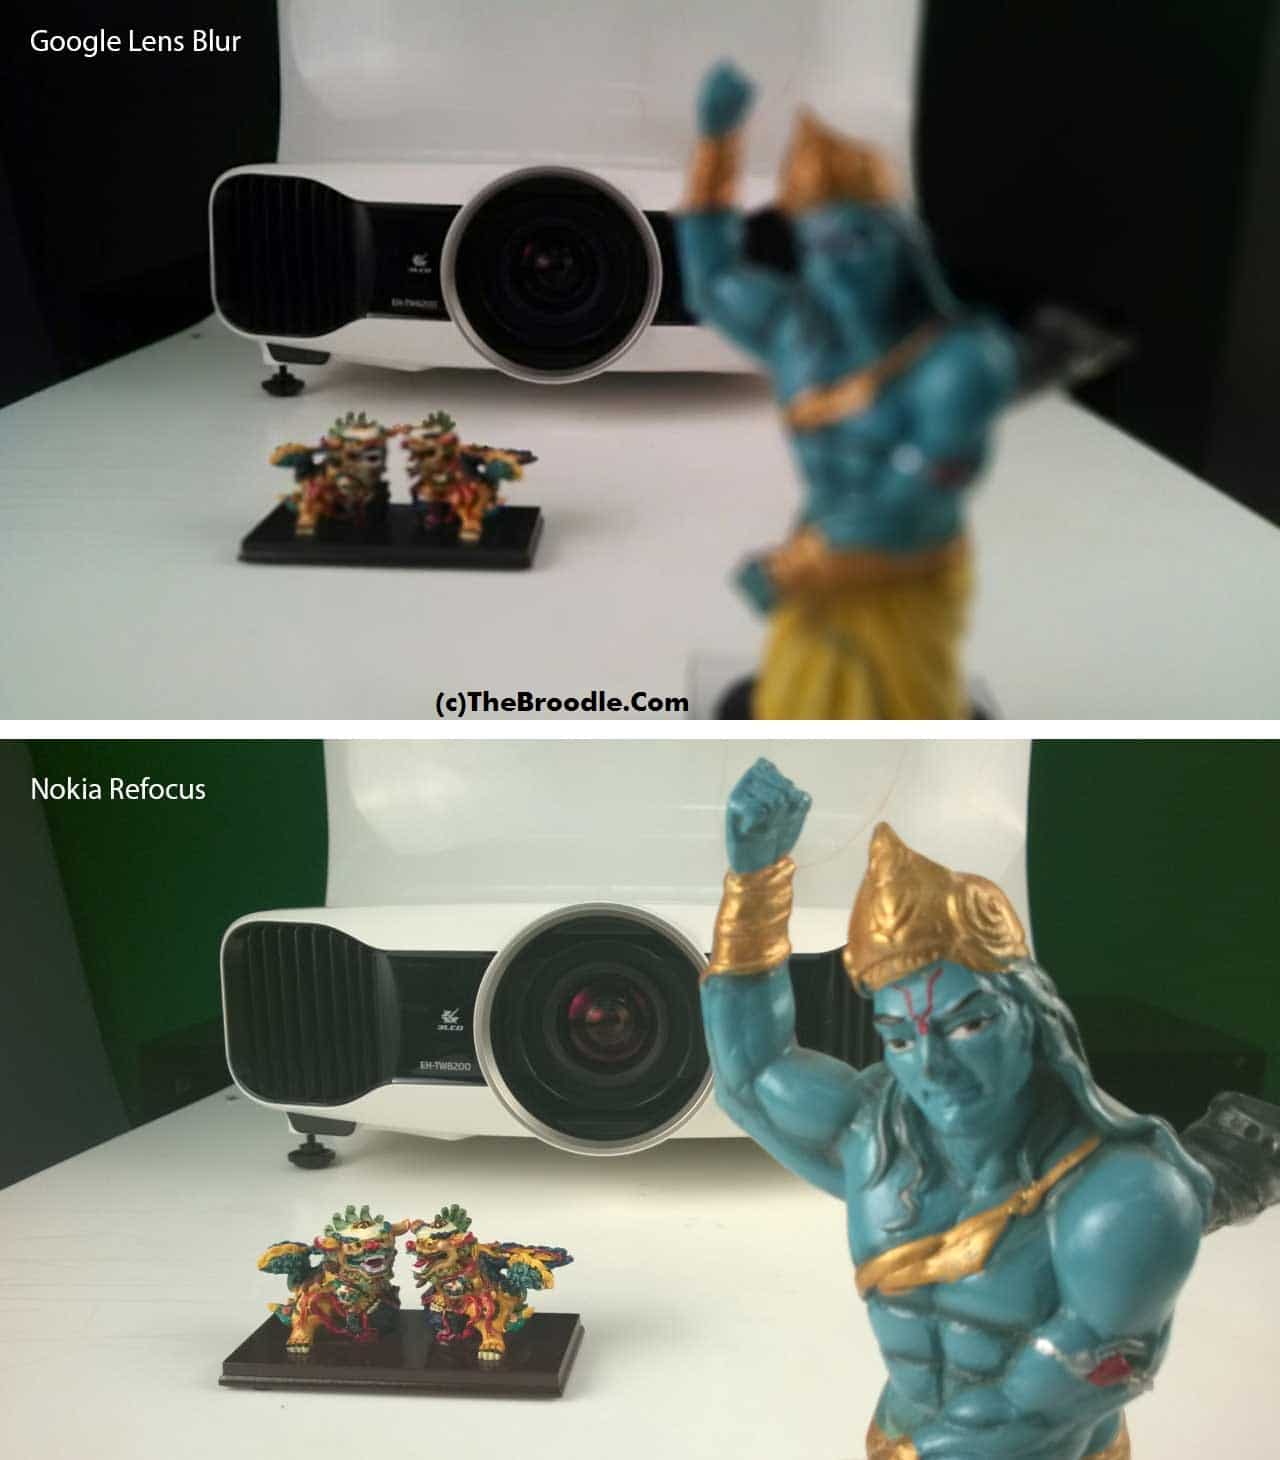
Here Once again, the projector looks sharper in Lens Blur because we can vary the intensity of the blur.
Google’s Lens Blur has one neat feature that’s missing from the Nokia’s Refocus app and that’s the ability to play around with the blur intensity for the background or foreground. The images shot with Google’s Lens Blur looks a lot more striking due to this fact. However, in terms of the number of focus points that are available to play with, Nokia’s Refocus app does a much better job here. Google’s Lens Blur is unable to get the full scene in focus accurately, due to which only some areas are sharp while others remain blurry despite shifting focus to them in post.
In the end, both apps perform pretty well although we feel Nokia has a slight edge when it comes to the capturing multiple focus points. It’s nice to see Google learning a thing or two from Nokia and hopefully they can add more functionality to this first effort.
While, Lens Blur is the most exciting feature of this update to Android’s stock Camera app, the refreshed UI and enhancements to Panaroma and Photosphere shots are great as well. Check out the official Announcement by Google below:
Today we’re launching Google Camera, a new app for your Android phone or tablet that makes it easy to take quick photos and videos. And being behind the lens just got more fun with new creative picture modes.
Sleek Design: The 100% viewfinder gets out of your way while capturing the maximum resolution of the scene (no dropped pixels). And the extra large capture button is easy to press so your eyes never lose sight of the subject.
Lens Blur: Emphasize the subject while blurring the background for an SLR-like shot with shallow depth-of-field (or bokeh). You can even change the subject in focus after taking the shot.
Improved Panorama: New higher resolution panoramas capture the full width and detail of a scene.
Photo Sphere: Immersive 360 degree photo spheres let you look up, down and all around…now at up to 50 megapixels! For the first time available on non-Nexus devices.
A few days before Google had released its Camera App in Play Store with many new features and improvements, but it is made available only for Android Devices running Android 4.4 KitKat.
XDA User unclefab has tried and successfully ported this app into JB devices and found working smoothly.
Features of Google Camera App :-
Photo Spheres for immersive 360º views
Lens Blur mode for SLR-like photos with shallow depth of field
Panorama mode with high resolution
100% viewfinder for getting the maximum resolution from the sensor (no dropped pixels)
Updated UI that gets out of your way and is centered on an extra large capture button
Works on phones and tablets running Android 4.4+ KitKat


")


")

")