More
    Home Blog Page 55

    10 Useful Tips to Improve Your WordPress Site Security

    WordPress is a very flexible and easy to learn CMS, on which you can implement almost any modern task. And these are just two of dozens of other reasons for its so high popularity. You need to understand that the popularity of WordPress is high in hacker circles. Therefore, it will never be superfluous to secure your site. Moreover, this is not so much and you need – just a few minutes of free time.

    I’m going to introduce you to 10 simple but very useful tips for improving the security of your WordPress.

    1. Never use the default admin name as the administrator username

    If for some reason this happened, just create a new admin user and delete the old one. Before deleting it, WordPress will ask you which user to associate the posts of the user to be deleted.


    2. Create complex long passwords using letters, numbers and various characters

    According to statistics, the most commonly used passwords are “123456”, “password”, “12345678”, “qwerty” and “123456789”. Naturally, sites with such passwords do not last long. It’s good if your password is not a dictionary word, it will have at least 15 characters, including lowercase, uppercase letters, numbers, and symbols.


    3. Use two-factor authentication

    For example, using the Rublon plugin or any other – the choice is wide enough. Two-factor authentication provides more reliable protection against unauthorized access and is already familiar to many users who use Internet banking, Google services, iCloud, DropBox, etc.

    4. Be sure to turn off the prompts in the WordPress login form

    After all, you know your username and password even without hints, even if you make a typo. And to the attacker, this information will only simplify the task of hacking. To do this, add a few lines of code to the functions.php file.


    5. Use plugins only downloaded from the official WordPress repository

    In an extreme case, with well-known proven resources such as CodeCanyon, GitHub always have positive user reviews. Never install hacked plugins downloaded from warez. Of course, if your site is dear to you.

    WordPress Tools and Plugins


    6. Timely update WordPress, themes and plugins to the latest versions

    Developers regularly release updates that close all discovered vulnerabilities. Current versions not only improve WordPress performance and compatibility but also significantly reduce the chance of hacking your site – this is a fact.


    7. Keep your WordPress clean

    Never store unused plugins and themes on the server. As a last resort, archive.


    8. Disable trackbacks

    There is little benefit from them, but they will certainly bring you troubles. Using WordPress trackbacks, cybercriminals can generate massive requests from such sites for the victim site, thereby causing a massive DDoS attack. Just go to your WordPress discussion settings and uncheck “Allow alerts from other blogs (notifications and trackbacks) to new articles. 


    9. Set the correct permissions for all files and directories on your site

    For directories, this is 755, for files, 644. You should be aware that giving permission to a file/directory to write (or worse still full access – 777 ), you expose your site to a serious threat. You can learn more about rights in the WordPress Codex.


    10. Prohibit viewing the directory index of your site

    Very often, a crookedly configured server in the absence of index.php or index.html files in the directory displays a list of directory files. Attackers can take advantage of this. To avoid this, add the line in .htaccess. Also, make sure that the wp-content/themes and wp-content/plugins directories have an empty index.php file.

    Top 10 Best WordPress Plugins to use in 2021

    Developing and maintaining websites is a very time-consuming process. It is not enough just to lay out the pages and uploads them to the hosting. In order for the site to function and indexed by search engines, it is necessary to optimize its download speed, prescribe the necessary meta tags on all pages, create contact forms, install protection against hacking, and if the site is multilingual, this will add to your headache! Yes, I completely forgot – the administrative page is also needed for the client to manage the site.

    CMS WordPress serves to make life easier for developers and administrators of web resources. This great CMS has a huge variety of plug-ins that greatly simplify the addition of certain necessary functions to the website.

    We would like to bring to your attention an article in which we describe the best plugins for CMS WordPress.

    This article will be useful for both beginners and experienced website developers.

    The ranking in the article does not matter. Below are the plug-ins (free and paid), which are most often used by our team when developing websites.

    So, our hit parade:

    1. Advanced Custom Fields

    Advanced Custom Fields
    Advanced Custom Fields
    Developer: WP Engine
    Price: Free

    The ideal tool for creating additional custom fields in the CMS WordPress admin panel with the possibility of the subsequent output of these fields on the site pages. Easily customizable, has a wide selection of fields, such as WYSIWYG Editor, Color picker, Textarea, Text, Image, etc. You can select any page of the site to place additional fields, any post type, set custom rules for display. Those who previously used the usual WordPress meta fields will appreciate this plugin. Without it, rarely does any client-oriented development work to create a convenient and understandable administrative panel.

    Pros of ACF

    • the basic version is free;
    • easy to configure;
    • very easy to display;
    • detailed documentation with examples;
    • a wide selection of fields.

    Cons of ACF

    • the most needed fields such as Repeater (repeater), an Options panel, Flexible content are available only in the premium version;
    • Unlike builders (Visual Composer) it has limited functionality, but it doesn’t load the site much less.

    2. Contact Form 7

    Contact Form 7
    Contact Form 7
    Developer: Takayuki Miyoshi
    Price: Free

    Do you want to install a feedback form on the site? Naturally! What is the contact page on the site without it?

    Contact Form 7 is the most popular WordPress plugin, installed on more than a million websites (according to WordPress repository statistics). Its rating among users is 4.5 out of 5 stars.

    Contact Form 7 is absolutely free. It has built-in support for Ajax sending, CAPTCHA, Akismet spam filter and many different add-ons that significantly extend the functionality.

    After creating a form, a shortcode is generated that allows you to paste it into any place on the page of the site.

    When installing, the default contact form is created; it can be changed in the Contact Form 7 settings.

    It has a wide range of fields and settings of the form itself, you can select several recipients and send a counter-message to the from sender.

    Pros of Сontact Form 7

    • free;
    • there is all that is needed to create a full-fledged contact form;
    • supports HTML markup;
    • Ajax sending support;
    • With the help of add-ons for this plugin, you can create huge forms \ questionnaires \ polls \ tests and connect the payment.

    Cons of Contact Form 7

    • need to understand the setting;
    • sometimes slightly weights the site;
    • sometimes conflicts with other plugins (for example with the Nextgen Gallery).

    3. All In One WP Security & Firewall

    Data Security

    Do you need to be sure that the site is not hacked? Need extra virus protection? In this case, All In One WP Security & Firewall is perfect!

    By itself, CMS WordPress is a fairly secure system, but it is possible to provide additional protection.

    Plug-in for CMS WordPress, allowing you to protect your site from hacking – All In One WP Security & Firewall. This tool will take your site protection to a whole new level. It has intuitive settings and a wide range of protection options. Also in the plug-in built the so-called “Security Strength Meter”, which will show the overall protection of the site on a scale from 0 to 205 points.

    All In One WP Security & Firewall is absolutely free and will not slow down the loading speed of your website.

    Pros of AIOSPF

    • easy to set up and use;
    • well protects from hacking the administrative page of the site database.

    Cons of AIOSPF

    • there is no possibility of scanning directories for the presence of malicious code;
    • it is easy enough to hack a site or close a site from being indexed by search engines in case of incorrect settings;
    • badly protects the file system.

    4. All In One SEO Pack

    Planning to conduct a search engine optimization site?

    All In One SEO Pack – number one for search engine optimization (SEO) site. Allows you to flexibly customize the internal optimization of the site. Not as easy to set up like its rival Yoast SEO. But since Yoast makes the site heavier when loading and often conflicts with other plugins, we chose the All In One SEO Pack.

    What features will the All In One SEO Pack provide? Creating sitemap.xml, defining canonical pages, creating robots.txt, micro marking for social networks, fine-tuning the “Title” and “Description” on the necessary pages of the site, integration with Google Search Console and much more.

    Pros of All In One SEO Pack

    • the basic version, which is enough for the site – free;
    • does not conflict with other plugins;
    • has integration with Google Search Console;
    • works great with multilingual plugins.

    Cons of All In One SEO Pack

    • not easy to configure;
    • fewer add-on modules than the Yoast SEO Plugin.


    5. WPML – WordPress Multilingual Plugin

    Plugin for a multilingual site. The only plugin in the review that does not have a free version. This is rather difficult to set up a translation tool, but unfortunately, there is no constantly updated, high-quality alternative.

    One of the best WordPress plugins to install additional languages ​​on the site. WPML includes support for more than 40 languages.

    Until recently, we used QTranslate X, it is free and easy to configure. However, the developers stopped its support 2 years ago. And currently, our team is working with WPML.

    WPML is suitable for all kinds of multilingual sites from blogs to online stores. Compatible with any themes and plugins that work using the WordPress API. Is friends with Advanced Custom Fields, Contact Form 7, Visual Composer, Woocommerce, Yoast and many others. Currently, perhaps the best plugin for a multi-language site.

    Pros of WPML

    • compatible with any themes and plugins;
    • supports 40 languages;
    • wide options in the settings;
    • great support.

    Cons of WPML

    • paid ($ 29 – for one blog, $ 79 – for three multilingual portals, $ 159 – for any number of sites);
    • quite complicated to configure.

    6. WooCommerce – An E-commerce Plugin

    ecommerce
    WooCommerce
    WooCommerce
    Developer: Automattic
    Price: Free

    Do you want to make an online store?

    WooCommerce is the most popular and best plugin for creating a full-fledged online store based on CMS WordPress. WooCommerce includes features that are very important for an online store. The basic version is completely free. There is a huge amount of inexpensive extensions that can add various features to the site. Has good documentation, often updated.

    Pros of WooCommerce

    • free basic version;
    • good support;
    • Google has almost any problem solving;
    • a lot of extensions;
    • excellent documentation.

    Cons of WooCommerce

    • hard enough to integrate into the topic;
    • many templates are broken down into numerous directories;
    • with inept tuning can negatively affect the speed of the site;
    • expensive official additions.


    7. Imsanity – Image Compression Plugin

    Imsanity
    Imsanity
    Developer: Exactly WWW
    Price: Free

    Is the site loading slowly? Most likely you either have no caching enabled or visual content is poorly optimized.

    To solve the problems with image optimization, we recommend using the Imsanity plugin.

    In the settings Imsanity, you choose the maximum size for images. When uploading images to the site, it automatically reduces the size of the images. Very well suited for blogs that do not require high-quality images.

    Pros of Imsanity

    • completely free;
    • many image compression settings, size, quality, resolution;
    • allows you to compress already loaded and those that are just going to load.

    Cons of Imsanity

    • Google Page Speed ​​doesn’t always like the way it compresses images, even with the most “optimal” settings.

    8. WP Migrate DB – Database Transfer Plugin

    Do you need a database transfer from one hosting to another? You made a site on a local server and want to upload it to the hosting?

    To do this, we recommend using a good free plugin WP Migrate DB.
    WP Migrate DB makes it much easier to migrate a database. Allows you to specify a new domain and a new location of files in the hosting directory. Creates an archive with a database for later transfer.

    Pros of WP Migrate

    • completely free;
    • easy to use;
    • with the right settings, changes the paths unmistakably.

    Cons of WP Migrate

    • Poorly suited for transferring large databases (online stores, corporate portals).

    9. Simple Share Buttons Adder

    Need buttons for social networks? There is nothing easier.

    The Simple Share Buttons Adder plugin makes it easy to add share buttons for social networks to any place on the site’s pages.

    Pros of SSBA

    • free basic version;
    • You can customize the colors of the buttons;
    • choose popular social networks;
    • create a shortcode and embed in any place on the site.

    Cons of SSBA

    • Not all social networks are supported.

    10. Autoptimize – WordPress Caching Plugin

    Autoptimize
    Autoptimize
    Price: Free

    Is the site loading slowly? Include caching (about compressing images was written above).
    Autoptimize is one of the most popular free caching plugins. It has many settings and allows you to compress scripts and styles, turn to cache on and off, transfer scripts to the footer, combine scripts and styles.

    Alternative – WP Rocket

    Pros of Autoptimize

    • absolutely free;
    • easy to set up;
    • well raises site performance in speed.

    Cons of Autoptimize

    • often breaks the site when all options are enabled, so you need to carefully read the documentation.

    Here, perhaps, that’s all. We would be grateful if you share the article on social networking platforms.

    Things You Need to Know Before Installing Hackintosh on Your Laptop

    Hackintosh is a project related to running the macOS operating system on personal computers with x86 microprocessors. A similar direction was born in 2005 when Apple officially announced the full transition from the PowerPC platform to x86. In fact, from that time on, the hardware level of iron ceased to differ from most Windows computers.

    Entire hacker communities are working on adapting and optimizing their own macOS builds, which can be installed on suitable computers.

    Initially, the list of supported hardware was rather poor, but over time, Apple began to use various components, including their support into the system, and the developers learned how to run popular modules using so-called cakes (an analog of the driver).


    What was the Hackintosh at the birth stage?

    About ten years ago, I myself was deeply interested in this topic, I tried and experimented with installing macOS on an old home systemic.

    I had to do a point upgrade, burn different assemblies onto dual-layer DVDs, and spend hours on finding cakes for installed PC components.

    The impression is twofold. On the one hand, Apple’s operating system seemed like a breath of fresh air after working continuously with Windows. Easy and pleasant interface, the application as a single file without the need for installation, the absence of the system registry and, as a result, malicious viruses.

    On the other hand, for comfortable work, we had to sort out one assembly of the system after another for a few days in a row, regularly experimenting and struggling with emerging problems.

    At that time, my hardware didn’t allow macOS to work stably. I was lucky to see a real Mac, and the way the operating system worked on my system reader did not hold water.


    What has changed today?

    Now, when I have a good laptop with a suitable filling, I again decided to return to the topic of Hackintosh. Before that, I had been working on MacBook Pro and Mac mini for more than five years, I had a good understanding of macOS, and I already know how the system should ideally work.

    Today, building a system unit for Hackintosh is not a problem at all. There are dozens of suitable components for each position, you can even choose the perfectly suitable accessories that Apple uses in Mac mini, iMac and Mac Pro.

    Enthusiasts from all over the world have been building desktop computers for Hackintosh for a long time and get more performance for the cost of a Mac or a similar computer in terms of performance is several times cheaper.

    Hackintosh PC

    Little different things are with laptops.


    Why Hackintosh on a laptop?

    Users who are trying to run macOS on laptops can be divided into two groups.

    Some need an Apple operating system to develop. It is impossible to write applications for macOS or iOS from under Windows, and working in a virtual machine has many limitations.

    Others just want to get a laptop with macOS for work cheaper than a MacBook.

    Hackintosh Laptop


    The first ones are less limited in the choice of the model because it will easily survive the inoperability of one or several components. For example, problems with the work of a webcam or card reader will not worry much about a writing application for an iOS programmer.

    The second for comfortable work should carefully choose a laptop on which it will turn out to start all the hardware without exception.

    The third option is not given here. About any serious work with graphics or editing the form on a laptop with Hackintosh speech can not go. It is not yet possible to launch a discrete video card.

    All existing options have too many nuances and shortcomings. Hackintosh for graphics or video – only stationary.

    Otherwise, you can get suitable analogs MacBook / MacBook Air / MacBook Pro 13 ″.


    What may not start?

    Video card

    About the discrete graphics, I mentioned above. It is better not to rely on it when working with Hackintosh. Either immediately choose a model with integrated graphics only, or completely disable the discrete card for macOS.

    The third variant promises long hours of dancing with a tambourine and rather ghostly prospects.


    Wi-Fi and Bluetooth

    This module is at risk. With a high degree of probability, you will have to either buy an external USB block or change the internal board.

    It’s easy to do it, suitable modules are sold on the same AliExpress and change in 10-15 minutes. At the same time, after installing such a block, it almost always turns out to launch all the pogrom chips like Handoff, Continuity, etc.


    Card reader

    It is quite problematic to replace the memory card receiver, and the chances of starting the native one are about 50/50. If this is one of the main requirements, it is better to immediately select a model with a 100% suitable block.

    Laptop Ports

    Type-C and HDMI

    Another place for potential problems. Modules may have a specific connection scheme, which makes it impossible for them to work in macOS.

    For example, an image via HDMI on laptops with discrete graphics can be displayed through a powerful card, and that, in turn, may not start up in Hackintosh.


    Touchpad

    Of course, even on the most suitable for Hackintosh laptops, it will not be possible to achieve the clarity and smoothness of the touchpad, like on a MacBook. The touchpad will either just work or refuse to start at all.

    In any case, you should be prepared to cope with Magic Mouse or Apple Trackpad.


    Webcam

    The problems here are quite rare, but it happens that the connection method does not allow the module to work in macOS.

    For example, I ran into such a problem: the camera in macOS stopped working after replacing the Wi-Fi module. It turned out that the new unit for wireless data transmission has a couple of additional contacts and intercepts a portion of the signal when it is loaded, preventing the camera from starting.

    The solution is trivial – to carefully tape extra contacts with scotch tape.

    I repeat once again that the problems described in this section can be circumvented if we correctly approach the choice of a device specifically for Hackintosh.


    What will work?

    Everything else will work without problems.

    The keyboard starts (even with a digital block), the buttons clearly work out the brightness and volume control. You can even start the backlight and its smooth adjustment function buttons.

    On my ASUS, in Windows with proprietary drivers, there are only 4 gradations of key illumination, and in Hackintosh, the glow can be changed within 10 positions.

    The system is able to correctly fall asleep and wake up, reliably display the battery charge (on some models there are problems with this).

    The display, processor, and drive work great. The last is required to enable TRIM.

    ICloud, iMessage, FaceTime, Handoff starts up from software chips. AirDrop works with small interruptions (but who really uses it?). Of course, there are no problems downloading applications from the Mac App Store and sharing these programs through the cloud.

    Even system updates can be installed without problems. It is recommended not to rush only with security updates. It is better to wait a couple of days after the release of the reaction on the thematic forums.

    The main thing that I was afraid of in my past experience is low system performance. It turns out that all this is far in the past.

    Now my ASUS perfectly impersonates the MacBook, in everyday tasks, there is no difference with the original Apple laptop at all. The only serious drawback can be considered the lack of a great apple touchpad.


    How to install Hackintosh on a regular laptop?

    The main difficulty that frightens many of the Hackintosh installations is the need to study sites and forums for a long time, to deal with images and cakes.

    The installation process itself looks something like this:

    1. We need a clean USB flash drive with 8 GB or more, Clover bootloader, and the operating system image itself (we’ll have to search for it ourselves).

    2. When macOS is deployed to a USB flash drive, the first most complex process begins. It is necessary to achieve the launch of the system on our hardware. To do this, you have to constantly throw patches and fixes into the bootloader.

    Everything you need can be found in one of the largest Hackintosh communities osx86project or on GitHub. Below are some of the popular ones:

    3. If you got your UFI build with proper kexts then you will be booted into the usual macOS installed. Next, you have to follow the on-screen instructions to install the macOS.

    4. After installation, it will be necessary only to add equipment for the equipment and peripherals to the system.

    Now finding a good Hackintosh wizard is pretty simple. I myself in a few days found a man who, for an adequate price, helped with the installation.

    Experienced professionals will even recommend specific models of laptops or computer components before purchasing or upgrading.

    If you decide to use the services of the wizard, everything will be much easier:

    • it will only be necessary to provide the specialist with a report on the components of the computer in order to prepare the installation image;
    • then we will make a bootable USB flash drive according to its instructions;
    • in the video call mode we will make the basic installation;
    • The wizard will complete the final configuration and debugging on its own through TeamViewer.

    In the future, these specialists are happy to advise on any errors or key system updates.

    And also help install the bootloader to select the operating system when the computer starts.

    This greatly saves time and effort, allowing you to get a computer with two operating systems at the output: macOS for everyday tasks and Windows for games, work with discrete graphics and specific applications.

    9 YouTube Tips to Improve Your Channel SEO

    Today we will learn how to raise your video rankings on YouTube with some easy to use SEO Tips. So I am going to share my experience of how I ranked my videos on top of YouTube by following these simple 9 tricks for improving my channel SEO.

    Before starting my channel, I looked at a bunch of videos from the so-called Youtube-SEO “experts”. And was hellishly inspired before the launch of the channel. I said to myself: “count up, your videos are about to be ranked and get heaps of views!”

    There was only one problem – this did not happen.

    No matter how hard I puffed over the video, the views barely moved. At some point, I stopped following the advice of these SEO experts. I pulled my lab coat and plunged into the research of all this SEO on my own. Believe me, I tested everything: different combinations of keywords, video length, previews, tags and a whole lot more.

    To understand how everything works, I went on a whole month of continuous research. But in the end, I developed a video ranking formula that really works. This helped my videos quickly improve positions, views, subscribers, and traffic.

    1. Put the keyword at the beginning of the title

    Every schoolchild and even his mom knows that you need to use a keyword in the title of the video. But not everyone knows that Youtube gives more weight to the words at the beginning of the title.

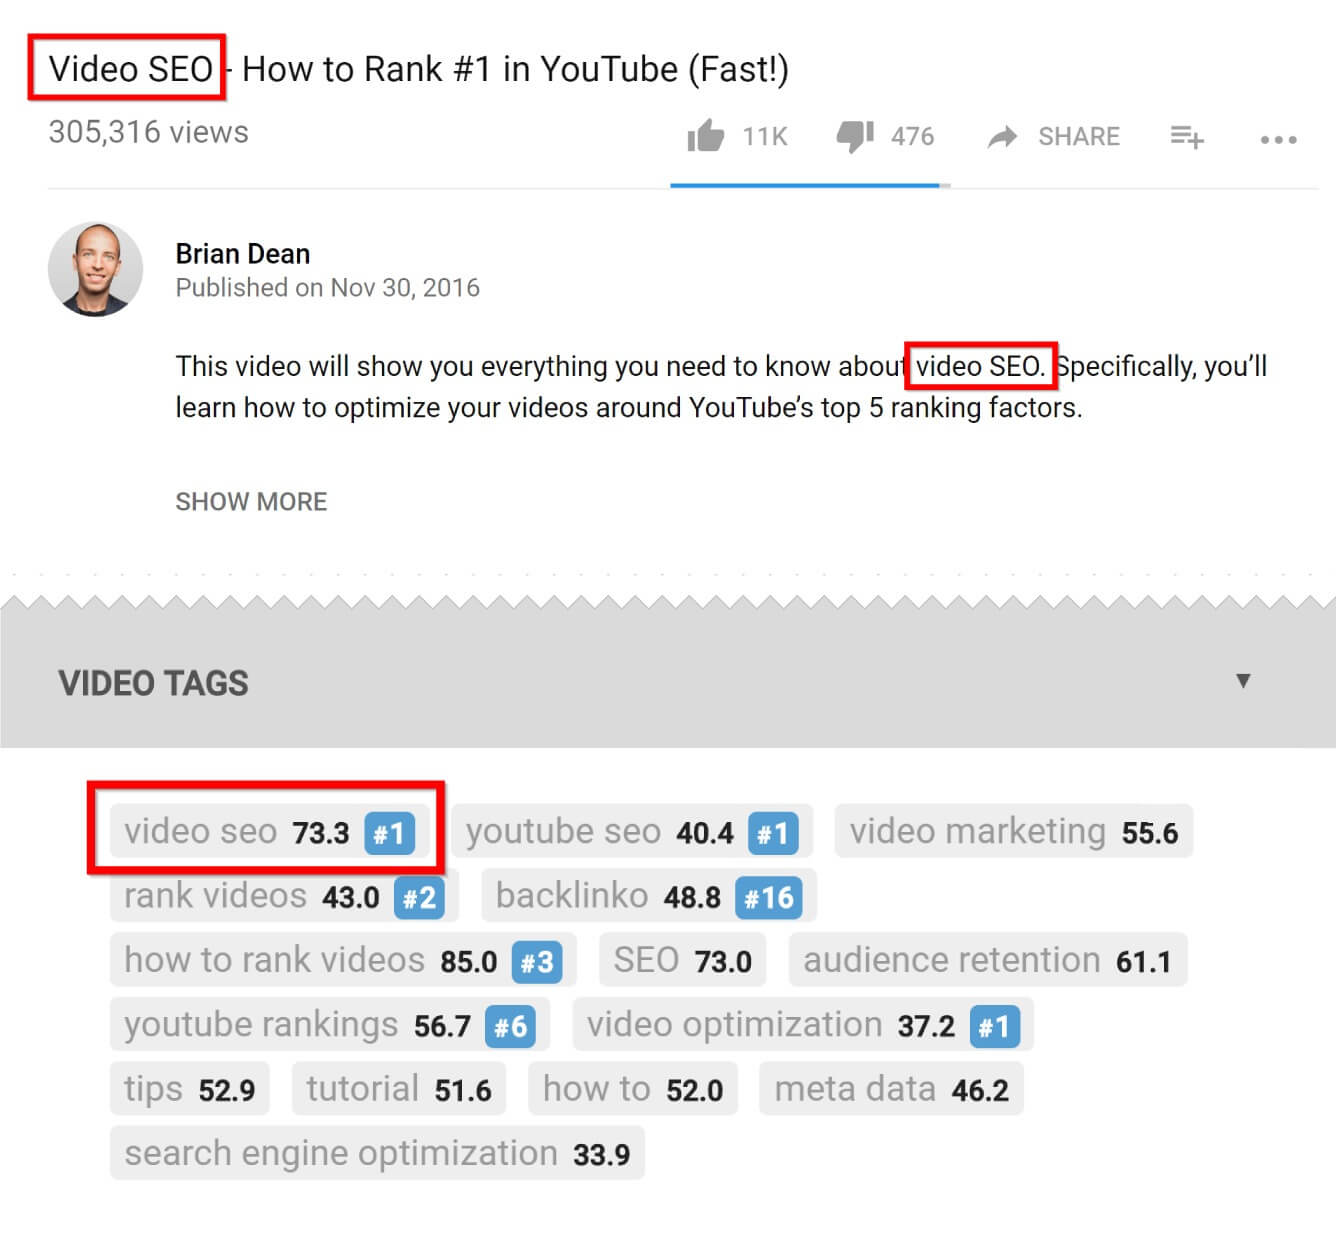
    For example, we want to move forward on the phrase “cold-brewed coffee.”

    Most would call the video as “The 7 Best Ways to Make Cold Brewing Coffee.” Normal title, nothing. But it can be made more effective by putting the keyword in the beginning. Then the headline will look like “cold brewing coffee: 7 best ways.” It works so well that I write all my headlines that way.

    2. Bleeding Involving Signals

    Last year we conducted the largest study of ranking factors on Youtube. We analyzed more than a million videos to understand why some are ranked higher than others. What did we discover?

    We realized that videos with more signals involving ranks better.

    What are these signals? These are sharing, likes, comments, and subscriptions.

    That is, no matter how a person is involved in the content, it tells Youtube that people like this video.

    Our research has shown that comments affect the ranking more than all other signals that involve.

    Then the question arises: how to make people comment more? After conducting a lot of tests, I realized that the call for specific action at the end of the video works best.

    Most bloggers use the usual call to action, such as “comment” or “let them know what you think.” But I realized that a specific call to action works much better. So, instead of the usual “comment”, let the audience comment on something specific.

    For example, at the end of this video, I asked subscribers which of the two strategies they would try first. Due to the fact that the question was easy to discuss, hundreds of people commented on the video.

    3. TAB ​​formula for video tagging

    According to our research, tags are not as important as they used to be but it still matters. So it’s worth spending some time on them.

    Unfortunately, most bloggers use tags like a macaque scalpel.

    Remember. Tags are designed to help Youtube understand the content of the video, and for this, they do not need to collect a whole bunch. When there are a lot of tags, it even confuses Youtube and Google. They just can’t understand what the video is about.

    If Youtube does not understand what the video is about, then it will not rank normally. Therefore, I advise you to use a little, but very specific tags.

    I called this approach the TAB formula (Targeting, Alternative, Broad) – an abbreviation of targeted, alternative, broad.

    Here is how it works.
    First, make sure that the first tag is a keyword. Just as with headlines, youtube gives more weight to tags that come before, especially to the first tag.

    If, for example, your keyword is a herbal smoothie recipe, then the very first tag will be a herbal smoothie recipe. Easy peasy.

    Next, write another two or three tags that will be alternative versions of the main one.

    For example, options for our main key would be “herbal smoothie recipe for breakfast”, “simple herbal smoothie recipe”. The easiest way to find keyword options is to enter it in the Youtube search and see what else it offers. Such hints will be ideal alternatives to the main key.

    And finally, you need to write one or two tags with a key in broad accordance. This tag describes the video in general terms or indicates the scope of activities. The essence of these tags is to give Youtube more context for understanding the video.

    For example, a wide tag for a “herbal smoothie recipe” would be “healthy food” or “smoothie”.

    4. Attractive Previews

    You probably already know that clickability on Youtube is an important ranking factor.

    In other words, the more often your video is clicked, the higher it rises in the output. How to get more clicks? Easy. Use addictive previews. What it is?

    These are previews that are specially made to attract attention and get more clicks.

    This preview is done in two steps:

    Step 1: do not use in Youtube color previews

    What does it mean? The main colors of Youtube are white, red and black. If you use them, the picture will simply merge with the background. Therefore, I advise you to take contrasting colors – green, blue, purple, gray and orange.

    Step 2: write on the preview in large bold

    My research confirmed that the previews with the text click more readily than without it. It is also quite small in size, which means there is not so much space for writing. Therefore, I advise you to use a maximum of 30 characters in the text.

    5. In the description of the video, write small posts

    At the very beginning, I did not put any useful thoughts into the description at all. It turned out that this is a huge mistake.

    After a lot of tests, I found that a long description on Youtube is ranked better. Because such a description helps Youtube to understand what your video is about. Therefore, I recommend making posts about 100-200 words in the description. To do that more efficiently, you can transcribe video to text and then put certain parts inside the description.

    And what is so much stitch-up?

    It is only necessary to describe the content of the video in general terms, without revealing the essence.

    In this form, even if someone reads the description, he will still need to watch the video to see the useful content itself.

    6. Increase video length

    So what is better for Youtube-SEO: long or short videos?

    After analyzing more than a million videos, we found that long clips are usually ranked above short ones. Our research has shown that the average length of a video on the first page of output in Youtube is 14 minutes 50 seconds.

    What the heck is that?

    The fact is that Youtube loves videos that keep the viewer on the site longer.

    Viewing the videos automatically increases the time spent on the site, which would be impossible, with a two-minute video.

    What is the result? Whenever appropriate, shoot videos from 8 to 15 minutes. My experience says that this is the ideal ratio for high positions.

    7. Square and round brackets in headers

    As I said, the clickability of a Youtube video is a ranking factor. And yes, the preview is an important part of this equation. But do not forget about the title – this is very important. Youtube says it this way: a good title can affect how your video is viewed and shared or scrolled.

    One of the easiest ways to increase clickability is to add a square or round brackets to the video header.

    Studies conducted by HubSpot say that adding parentheses to the header increases click-through rate by 38%.

    For example. Imagine that we just uploaded a video about video marketing with the heading “Video Marketing Tips: 10 Ways to Get More Views.” Now, according to the HubSpot study, if we add “(today)” to the end, we will receive many times more clicks. In general, parentheses work so well that I use them in each of my headings.

    Here are some good examples of what can be written in brackets. (quickly!), (case study), [new research], (effectively), (real story).

    8. Ranking on the proposed video

    That is the trick. Youtube SEO is more than just a ranking in issuing. You can get as many views, if not more, and in the video to which our video is offered as similar.

    The proposed video is when your video appears next to the one you are viewing, in the right sidebar. So, if our video appears next to a very popular one, we will steal some of its views.

    The best way to do this is to use the same tags.

    When Youtube notices matches in tags with a popular video, it understands that your video is on the same topic. So, it is more willing to rank the video as suggested.

    For example, we want to be offered to a video. First, we look at what tags he has. To do this in Chrome, you need to right-click on a free field and click “view page code.” Next, find in the code section “keywords”. The key phrases in this line will be the video tags. You can use TubeBuddy or VidIQ to not dig into the code.

    Now, take a few tags found and copy. Be sure to copy the tags exactly – word for word. And if the video is of good quality and at least close to popular, Youtube will rank our video as a suggested video.

    9. Turn a donkey into a unicast

    There are millions of small channels who have videos whose performance is better than others on the popular channel. Why is that? There are many reasons, but after analyzing millions of videos, I noticed that successful videos have one thing in common – a great indicator of viewing time.

    We talked about watching the time a couple of minutes ago. This is all the time that the viewer has spent on watching the video. Recently, I found a great way to pump this indicator, that is, to turn donkeys into unicorns.

    Here is how it works.

    First, you need to go to the analytics panel of the channel, in the “audience retention” tab. This report shows how many minutes from the video was viewed and at what minute the viewer left. Now you need to find on your channel video with the best performance. Note where the audience retention is highest, with peaks above average. Look at this passage and draw conclusions that kept the viewer’s attention. Maybe you added a graph to the screen? They joked on excellent or just changed the angle of shooting.

    Take these points on the note and use in the next video.

    I know, I promised nine strategies, but recently I found one small hack that worked very well for me. I want to share it with you.

    The hack is to add the current year to the video header.

    Viewers want to see modern and relevant content.

    Yes, yes, yes, thank you cap. But the thing is this. How to show the viewer that your content is useful today? Add current year to headline.

    When you do that, your videos stand out from the video and the proposed videos. That means more clicks and views. In addition, most people when looking for something in Google and Youtube add to the request the current year. Therefore, adding a year to the title and description of the video, you rank better for such requests.

    Start to put the keyword in the beginning? Or are you ready to turn donkeys into unicorns? Tell us in the comments.

    Tips to Optimize Facebook Page SEO and Get More Likes

    One of the ways to promote your business on the Internet is to use the Facebook platform, which is used daily by hundreds of millions of people around the world. The best option would be to create your own organization page on this social network. Regular interesting and useful publications will attract the attention of many people, some of whom will later use the services of the company.

    A business page on Facebook allows you to create a positive reputation for the company and get new customers. Social media marketing (SMM) technologies are perfect for page promotion. They will help to increase the number of subscribers and to create a constant target audience.

    But the interaction of the Facebook page with major search engines is still poorly understood. But there are general principles that should be followed to increase interest in the page from the search engines. The main ones are listed below. Using them, you can get additional customers who will come from the issuance of search engines.


    Pay Attention to the Page Title

    When choosing a title for a business page, you should be very careful. The fact is that search engines similar names are in the form of first-level headings (H1). As you know, this is one of the key factors of ranking. Therefore, the name should consist of the brand name or relevant keywords. It is by name that Internet users will continue to find the page in search results.

    It is also recommended to create a short URL that will include keywords. It will simplify the perception of the address for people and will be useful for promotion in search engines. You can set such a URL if the page has 25 or more subscribers.


    Number of Backlinks

    Another key ranking factor is the reference weight of the project being promoted. This factor is relevant to communities in social networks. The more links to the page and posts of the community, the more likely to take a high position in the search results. It takes into account not only links that are published on third-party resources but also references to the community within the social network itself. And not only the number of backlinks is important, but also credibility in the eyes of the search engines for the resources from which they lead.


    Regular Publication of Thematic Content

    It is recommended to regularly publish on the page interesting for users thematic information. This will not only increase the interest of the user audience to the page but also have a positive impact on the promotion.

    Search engines have a positive attitude towards projects where information is frequently updated. All published messages are indexed by search engines. Therefore, it is important to create optimized content. Competently chosen keywords will positively influence the process of promotion.

    In addition to messages, search robots also index tabs that are placed on the page. At the same time, their importance is more important compared to ordinary posts. It is therefore very important to use optimized headings and subheadings on tabs, as well as highlighting important information with keywords in bold.

    It is worth paying attention also to the page settings. They have content rights management functions. The administrator can disable or allow viewing of messages to users who are not subscribers to the page. If you prohibit viewing of such visitors, the search robots will also not be able to access this information. Therefore, full-page indexing will not be performed.


    Choose the Correct Presentation Format

    When publishing messages in thematic communities, many administrators use images that contain body text. But to advance this option of presenting information will be ineffective since the search engine ranking algorithms do not take into account what is shown in the pictures.

    Therefore, even if you post messages in the form of pictures, it is desirable to duplicate information in text form. Thanks to this message will be successfully indexed by search engines.

    But when creating content you shouldn’t optimize it strongly at the expense of quality. You should always remember that the page is created to interact with users. Therefore, the information should be presented in such a way that it is convenient for perception by the visitors.


    Optimization of Videos and Images

    A modern page on the Internet contains not only textual information, but also thematic images and videos. They should also be optimized for more effective promotion.

    To optimize images, include keywords in the file name. And for the video is recommended to come up with an interesting title, which will also be written with key expressions.


    Increase Page Popularity

    For high-quality page promotion, it is important to form an interesting audience. The high activity of users, a large number of “likes”, comments, and reposts indicates that this page is of high quality and interesting for visitors. And this will have a positive impact on the process of promotion and position of the page in the search results.

    10 Apps to Create Instagram Stories that are Professional & Stunning

    Modern man is already very accustomed to sharing what he saw on social networks, especially convenient to do it on Instagram, which was once conceived as a photo-sharing application. Since the stories format appeared on the platform, users have also appreciated it, and it has become the fastest-growing function from Facebook – today 400 million users of this platform record stories.

    To make your content laid out in a more attractive way, you can use special tools. They will not only help you find your unique and recognizable style but also facilitate routine processes, such as trimming to the right time.

    In this review, we will list 10 applications for creating Stories on Instagram, which will give you inspiration, diversify content and simply help to embody ideas.

    1. Unfold

    This is one of the most popular tools for creating a story in the world. It has a rich library of different templates from “polaroid” styles to unusual frames. The application is free for iOS and Android.

    2. Canva

    In this mobile application, you can not only choose ready-made templates from the library but also create your own using many options for the background, 130 fonts, and different graphic elements. Thanks to the tool you can make the story as close as possible to the style of your brand. This application is also free.

    ‎Canva: Design, Photo & Video
    ‎Canva: Design, Photo & Video
    Developer: Canva
    Price: Free+
    • ‎Canva: Design, Photo & Video Screenshot
    • ‎Canva: Design, Photo & Video Screenshot
    • ‎Canva: Design, Photo & Video Screenshot
    • ‎Canva: Design, Photo & Video Screenshot
    • ‎Canva: Design, Photo & Video Screenshot
    • ‎Canva: Design, Photo & Video Screenshot
    • ‎Canva: Design, Photo & Video Screenshot
    • ‎Canva: Design, Photo & Video Screenshot
    • ‎Canva: Design, Photo & Video Screenshot
    • ‎Canva: Design, Photo & Video Screenshot
    • ‎Canva: Design, Photo & Video Screenshot
    • ‎Canva: Design, Photo & Video Screenshot
    • ‎Canva: Design, Photo & Video Screenshot
    • ‎Canva: Design, Photo & Video Screenshot
    • ‎Canva: Design, Photo & Video Screenshot
    • ‎Canva: Design, Photo & Video Screenshot
    • ‎Canva: Design, Photo & Video Screenshot

    3. InShot

    It so happens that the video was filmed, but its size is not suitable for story, and the content is wonderful – funny or topical – can not be thrown out. Do not despair! Come to the aid of a free application InShot, which can trim, crop, merge and more the video to the desired format.

    4. Adobe Spark Post

    Another free application specifically for creating a story: it offers thousands of ready-made templates for high-quality graphic design.

    ‎Adobe Express: Graphic Design
    ‎Adobe Express: Graphic Design
    • ‎Adobe Express: Graphic Design Screenshot
    • ‎Adobe Express: Graphic Design Screenshot
    • ‎Adobe Express: Graphic Design Screenshot
    • ‎Adobe Express: Graphic Design Screenshot
    • ‎Adobe Express: Graphic Design Screenshot
    • ‎Adobe Express: Graphic Design Screenshot
    • ‎Adobe Express: Graphic Design Screenshot
    • ‎Adobe Express: Graphic Design Screenshot
    • ‎Adobe Express: Graphic Design Screenshot
    • ‎Adobe Express: Graphic Design Screenshot
    • ‎Adobe Express: Graphic Design Screenshot
    • ‎Adobe Express: Graphic Design Screenshot
    • ‎Adobe Express: Graphic Design Screenshot
    • ‎Adobe Express: Graphic Design Screenshot
    • ‎Adobe Express: Graphic Design Screenshot
    • ‎Adobe Express: Graphic Design Screenshot
    • ‎Adobe Express: Graphic Design Screenshot
    • ‎Adobe Express: Graphic Design Screenshot
    • ‎Adobe Express: Graphic Design Screenshot

    5. Splice

    The creators of GoPro know that vertical video is a real trend. Therefore, they have developed a special application for editing vertical video. The app simplifies cropping, changing speed, adding effects, titles, animations and much more!

    The application is available only for smartphones on iOS, it is free if you are ready to put up with the watermark Splice. If you want to remove it, you have to pay $9.99 – not so much for a good application.

    6. CutStory

    Since you can upload only 15-second videos to Instagram Stories, it would be nice to have a tool that quickly cuts your videos to the right length. If you have an iPhone, then CutStory is just such an application, and it’s also free.

    It is important that in order to avoid confusion, the clips are exported to the application in chronological order. In addition to this video, you can edit a little – add graphics or music.

    7. Hype-Type

    Again, pleasant opportunities for owners of smartphones based on iOS. Free application Hype-Type decorate Stories animated texts.

    ‎Hype-Type: Moving Text Photo-s
    ‎Hype-Type: Moving Text Photo-s

    8. 8 mm

    Old videos with scratches, cracks, and discoloration can be mesmerizing, right? With the 8 mm app, you can shoot today’s events, and it will make them look like the events of the last century. Unfortunately, again only on the iPhone.

    ‎8mm Vintage Camera
    ‎8mm Vintage Camera
    Developer: NEXVIO INC.
    Price: $3.99+
    • ‎8mm Vintage Camera Screenshot
    • ‎8mm Vintage Camera Screenshot
    • ‎8mm Vintage Camera Screenshot
    • ‎8mm Vintage Camera Screenshot
    • ‎8mm Vintage Camera Screenshot
    • ‎8mm Vintage Camera Screenshot
    • ‎8mm Vintage Camera Screenshot
    • ‎8mm Vintage Camera Screenshot
    • ‎8mm Vintage Camera Screenshot
    • ‎8mm Vintage Camera Screenshot
    • ‎8mm Vintage Camera Screenshot
    • ‎8mm Vintage Camera Screenshot
    • ‎8mm Vintage Camera Screenshot
    • ‎8mm Vintage Camera Screenshot
    • ‎8mm Vintage Camera Screenshot
    • ‎8mm Vintage Camera Screenshot
    • ‎8mm Vintage Camera Screenshot
    • ‎8mm Vintage Camera Screenshot
    • ‎8mm Vintage Camera Screenshot
    • ‎8mm Vintage Camera Screenshot
    • ‎8mm Vintage Camera Screenshot

    9. Quik

    If you are shooting mostly on GoPro, then you definitely need to get the Quik application – it was created specifically to handle the clips from the action camera.

    The application is free and available to owners of smartphones based on Android and iOS, it offers pre-installed transitions, graphics, and soundtracks and optimizes video for vertical display.

    10. Magisto

    The work of this application has already been appreciated by 90 million users worldwide. It is free and suitable for both iOS and Android. Magisto is able to make a story from a photo that is not inferior to ordinary video. The application interface is intuitive and videos are created and edited in three simple steps.


    There would be a desire, and tools for creativity will be abundant. Make interesting videos and make them high-quality content that will attract the attention of your subscribers and will not leave anyone indifferent. And most importantly, do not forget to enjoy the process! Good luck!

    Things You Need to Know Before Uploading a Video on IGTV

    On June 20, 2018, Instagram CEO Kevin Sistrom announced the launch of IGTV, an application for creating long videos embedded directly in Instagram.

    Full-screen vertical video up to an hour can now be uploaded by any Instagram user. Such a step of the company can be explained by the growing popularity of video in social networks and the desire to compete with YouTube. The CEO also announced that Instagram had surpassed the 1 billion user mark and ranked third in the ranking of the world’s largest social networks (after Facebook and YouTube ).

    All this makes IGTV an incredibly promising platform for business.

    What You Should Know Before Publishing a Video on IGTV?

    • Fullscreen and vertical videos.
    • The permissible length of the video is from 15 seconds to 60 minutes (Larger accounts and verified accounts can upload videos up to 60 minutes long, but they must be uploaded from a computer).
    • You can watch the video on Instagram and in the IGTV application.
    • In th IGTV application users have access to Subscriptions, Popular and View more.
    • Involvement: users can like, comment on your video, and also share the video on other plateforms.
    • Creators have their own channels, like on YouTube, all users can be content creators.
    • Videos can be uploaded to the IGTV application or the web version of the social network.
    • You can download the application for iOS and Android.
    • Videos from IGTV can also be uploaded to Facebook Watch.
    • Allowed file size up to 3.6 GB.
    • The file format is MP4.
    • Video Cover – JPG Format.
    • While advertising options are not available, but soon Instagram will allow popular creators to monetize their content.
    • Videos can be searched by keywords, but they must be in the channel name or profile name.
    • You can rewind the video, the timeline appears in full-screen mode at the bottom of the screen.
    • You can move between the rollers by flicking the screen left or right.


    How to Upload a Video on IGTV?

    Upload on IGTV

    First, you need to create a channel. Log in to the application and click on the icon of your profile on the right. After that select Upload video. In the device gallery, select the appropriate video and click Next.

    The application will offer you to change the cover, enter a name, description and set up access. After uploading, your video will be available to everyone, and a new icon will appear on your Instagram page.

    You can upload videos in the web version of the social network. To do this, go to your account and select the section IGTV. Adjust the settings and add a video.

    If your brand already has a strong presence on Instagram, do not miss the opportunity to master the new IGTV format before competitors.

    How to Disable the WordPress Gutenberg Editor Without Any Plugin

    The latest WordPress version 5.0 introduced the Gutenberg Editor / Block Editor replacing the old Classic Editor. Today we will be discussing on how we can disable the Gutenberg Editor and get back the Original Classic Editor in WordPress without using any 3rd party plugins or the Classic Editor Plugin.

    You can switch back to the classic editor by installing the Classic Editor or by disabling the Gutenberg plugin. In fact, the classic Classic Editor editor code, which was not deleted in WordPress 5.0, is just a switch.


    How to Switch to Classic Editor in WordPress 5.0 Without any Plugin?

    You can very easily disable the Gutenberg Editor in WordPress 5.0, you just need to add the below code in the functions.php file of your theme.

    add_filter('use_block_editor_for_post', '__return_false');
    

    You can find the functions.php file in the wp-content/themes directory inside your theme folder. You can also edit the file directly from WordPress, to do so head over to Appearance >> Theme Editor and edit the functions.php file.

    After doing the above step the Gutenberg editor will be disabled and the old Classic Editor will be restored, however, the front-end will still load the relevant style files for the Gutenberg editor and to complete disable those too add the below line of code into your functions.php just below the above code.

    
    **
    * Disable Gutenberg frontend scripts.
    */
    function df_disable_gutenberg_wp_enqueue_scripts() {
    wp_dequeue_style('wp-block-library');
    }
    
    add_filter('wp_enqueue_scripts', 'df_disable_gutenberg_wp_enqueue_scripts', 100);


    This will prevent front-end from loading the style files.

    According to the official WP Blog, the Classic Editor will be completely removed from WordPress in 2021, but you don’t have to worry about it. There will be a full set of Classic Editor editor plug-ins for you to choose and get the Classic Editor back.

    Method 2: Using the Official Classic Editor Plugin

    You just need to install the plugin and that’s all the Gutenberg Editor is gone.

    However, if you don’t want tons of plugins into your WordPress installation then the above method also works fine and does the same thing as this plugin do.

    Classic Editor
    Classic Editor
    Price: Free


    How to Fix SSL Error “Your connection is not private” on Your Android Device?

    As the browser information indicates, one of the most common problems on Android devices is: “Your connection is not private.” It will even appear on the latest devices and the current OS, which may make you Confused. Although this is not a big problem, let’s take a look at how to fix the SSL connection error on Android phones.

    SSL Android Error


    Let’s start with the SSL/TLS certificate

    The first is a bit of background knowledge. As you may know, the SSL certificate is designed to authenticate the website you are about to visit – in the past it was done by a certificate authority, and the certificate authority was able to issue a certificate to make sure you know who is on the other end of your connection – And encrypt all communication between the browser and the web server.

    It’s never a good idea to browse the site without a secure connection.

    Now, for the sake of clarity, there is a last bit of information. At the moment, SSL is really just an oral term for the protocol. SSL stands for Secure Sockets Layer, which was the original encryption protocol, but not long ago TLS, or Transport Layer Security, replaced it. Essentially, they do the same thing, but now, true SSL has been eliminated (Android no longer supports SSL 3.0 – its last version), so what we are really talking about now is the TLS certificate.


    How to fix SSL connection error on Android phone?

    When you receive an SSL certificate error message on your Android phone, there are several ways to help you solve this problem. We will list five possible solutions. If one doesn’t work, try the next one. In the end, you will correct the problem.


    1. Correct the date and time on your Android device

    This may help you fix this Android error immediately. Just make sure your date and time are correct. To do this, go to Settings and select “Date & Time.” Here you can activate the “Automatically update date & time” option.


    2. Clear browsing data on Chrome

    If the method of modifying the date & time is invalid, you may need to clear your browsing data. This is another easy way. First open Chrome, click on the “Menu” option, then go to “Privacy” and select “Settings.” Then select “Clear browsing data.” Check all the checkboxes on the screen, then click “Clear.”


    3. Change WiFi connection

    If neither of the above methods works, try changing the WiFi connection on your device. You may be logged in to public WiFi, as it is known to be unsafe. Find a private WiFi connection and see if the Android bug has been fixed.


    4. Temporarily disable anti-virus software

    If you have installed anti-virus or security apps on your Android phone, try temporarily disabling it before you start browsing the web. Sometimes these apps may interfere with your browser, making them unable to make SSL connections.


    5. Reset your Android device

    This can cause big changes, but if all the other suggestions mentioned above don’t resolve this SSL certificate error, you may have to reset your device. In this case, the first step is to back up your phone in case you lose everything you stored before. After that, select “Device” and then click “Backup & Reset.” and then click “Reset Factory Data”.

    Why Should You Consider a WordPress Based Eommerce Site?

    Generally speaking, when you hear people say they want to open an e-commerce store, you will find that they are talking about using Magento, Opencart, Prestashop or Shopify as the content management system (CMS) to build an e-commerce website. If you ask them why they don’t use WordPress, they usually answer “no” for the following reasons:

    1. It is not scalable.

    2. It cannot handle so much traffic.

    3. There is no good e-commerce platform. WordPress is just created for blogs

    4. A large number of e-commerce functions must be built into the WordPress content management system.

    5. There is no good back-end support for inventory management, sales reports, etc.

    6. Vulnerable to security threats.

    7. ERP integration is not supported.

    Not to mention that the last “ERP integration” is currently under development, I am happy to say that WordPress has a strong response to all of these debates. Most of these things have changed over the past six months, as there have been some great WordPress plugins like WooCommerce Inventory Management that have revived e-commerce in WordPress.

    One of the biggest reasons I’m asking you to consider using WordPress is that it has a huge community.

    WordPress is the most popular website platform ever. 63% of all websites hosted on CMS use WordPress, which means it has a huge community, and because it is open source, you can almost get it. All the answers.

    Scalable? Can’t Handle Too Much Traffic?

    For the most popular sites like Techcrunch, Gizmodo, and SmashingMagazine, WordPress is the best CMS ever, and these sites handle millions of visitors every day. Without a doubt, WordPress is an extensible platform.

    Can it be extended to serve as an e-commerce platform?

    This is a point to be proved, I have not found any examples, but I firmly believe that it can be extended to serve as an e-commerce platform.

    Is WordPress just Created for Blogging?

    Now, for all those who still think that WordPress was created just for blogs, this is a wake-up call. WordPress or CMS has been around for 2 to 3 years. You can create directories, categorize sites, and you can use the popular BuddyPress and WPMU plugins to build a social network about WordPress.

    E-commerce Functionality?

    Ok, you need to take a hard look at WooCommerce and its features. You get a lot of features, while others can be obtained by installing some paid and free plugins. With these you can get:

    1. Review system and rating

    2. Sales and storage table

    3. Custom advice: you may also like

    4. Multiple picture support

    5. Multiple picture and zoom functions

    6. Social integration

    7. Multi-payment gateway integration (from Paypal, 2CO to CCAvenue)

    8. Credit/Debit Card/Online Bank Direct Integration

    9. Multi-currency payment processing

    10. Distribution System

    11. Save, publish, and share shopping carts on social platforms, so with WooCommerce and some free and paid plugins, all of these features are supported by WordPress.

    Vulnerable to Security Threats

    Although some might say that since WordPress is an open source platform, it is vulnerable to hacking. On the other hand, WordPress has the largest community, they brainstormed, submitted many WordPress vulnerabilities, and the WordPress core is often updated. Updating the core is as simple as clicking a button. Now, every e-commerce system is built on an open source platform, so it is different from other systems.

    WordPress becomes a content creator not only because of the functions mentioned above but also every e-commerce website wants users to participate in the following social activities, such as:

    1. Create an account on their website.

    2. Participate in the comments.

    3. Share their shopping cart.

    4. Create a group and make friends.

    5. Hold discussions about products and activities.

    In addition, you can get SEO benefits through plugins such as Yoast SEO and W3Total Cache. Think about how much development work you can save…

    Is this all possible in Magento, open cart, PrestaShop, Shopify or age-old oscommerce? No, but are these feasible in WordPress? Yes!

    WordPress combines BuddyPress and WooCommerce, so you can give you the most powerful platform to host e-commerce sites of all sizes.

    Think about how many possibilities you can get with WordPress + Buddypress + WooCommerce + BBpress. I haven’t seen any WordPress themes built on Themeforest, MojoThemes, WooThemes, or Elegant themes, and these WordPress themes even use only half the potential that current WordPress can offer. Although the potential is huge, I see very few people doing this, so in the end, it left us a huge opportunity.