More
    Home Blog Page 204

    Top 5 Best Free Windows 8 and 8.1 Themes / Skin Packs

    Themes, Skin Packs or Transformations Packs all are ways of transforming your Windows OS look into awesome, beautiful, attractive, cool and sexy look.

    We are here to showcase Best Top 5 3rd Party Themes for Windows 8 and Windows 8.1 Users.

    Theme Installation Procedure on Windows 8 and 8.1 :-

    Before we proceed downloading new themes we need to Patch some Files in Windows 8 and 8.1 for 3rd Party Themes.

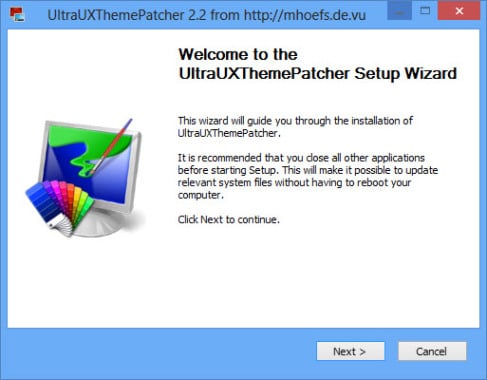
    For this you need to download UltraUXTheme Patcher from the below link. its the best tool available for Patching Windows Files.

    UltraUXThemePatcher for Windows 8 and 8.1
    UltraUXThemePatcher for Windows 8 and 8.1

    This program will run as your theme engine service so you can use any 3rd party visual style on all Windows operating system.

    Download Auto UXThemePather

    After Patching, proceed forward.

    Top 5 Best Windows 8 and 8.1 Themes :-

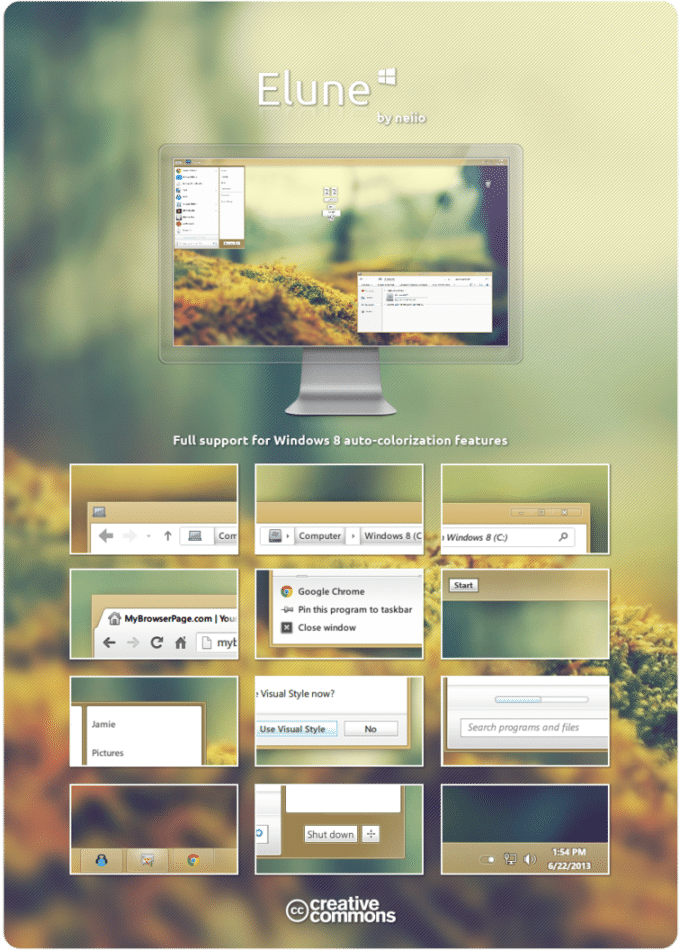
    1. Elune by neiio

    Elune Theme by neiio for Windows 8 and 8.1
    Elune Theme by neiio for Windows 8 and 8.1

    Download Elune Theme by neiio

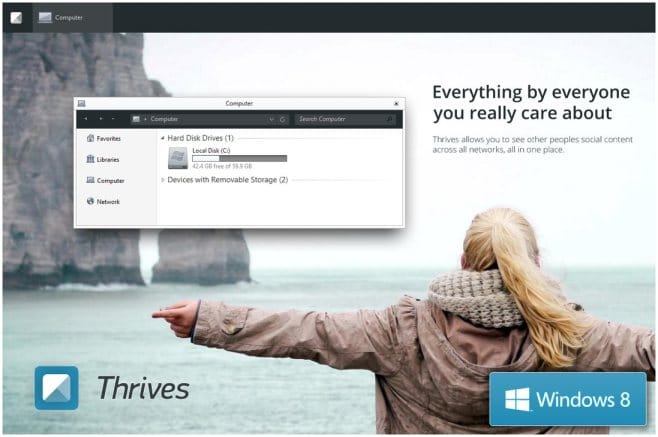
    2. Win 8 Thrives

    Thrives Theme for Windows 8 and 8.1
    Thrives Theme for Windows 8 and 8.1

    Download Win 8 Thrives Theme

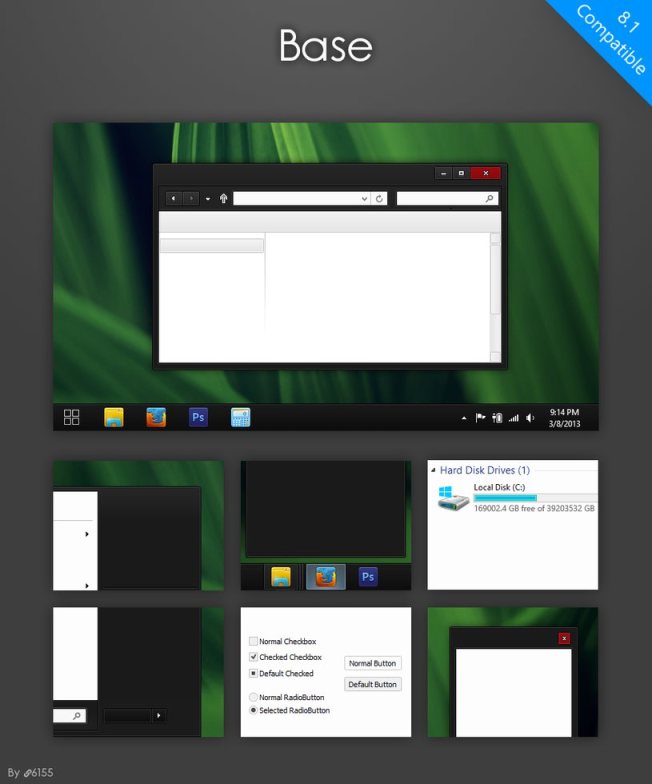
    3. Base Theme for Windows 8 and 8.1

    Base Theme for Windows 8 and 8.1
    Base Theme for Windows 8 and 8.1

    Download Base Theme

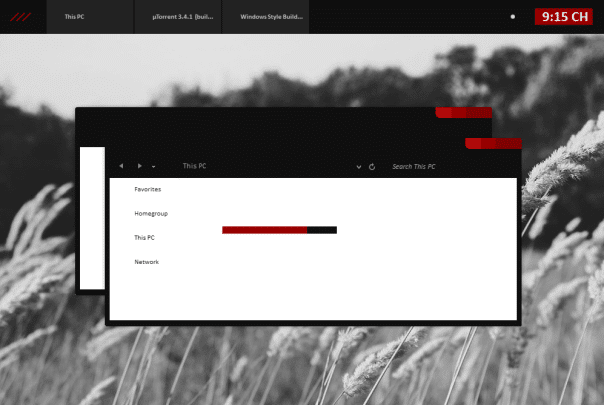
    4. Black Red Minimal Theme

    Black Red Minimal Theme for Windows 8 and 8.1
    Black Red Minimal Theme for Windows 8 and 8.1

    Download Black Red Minimal Theme

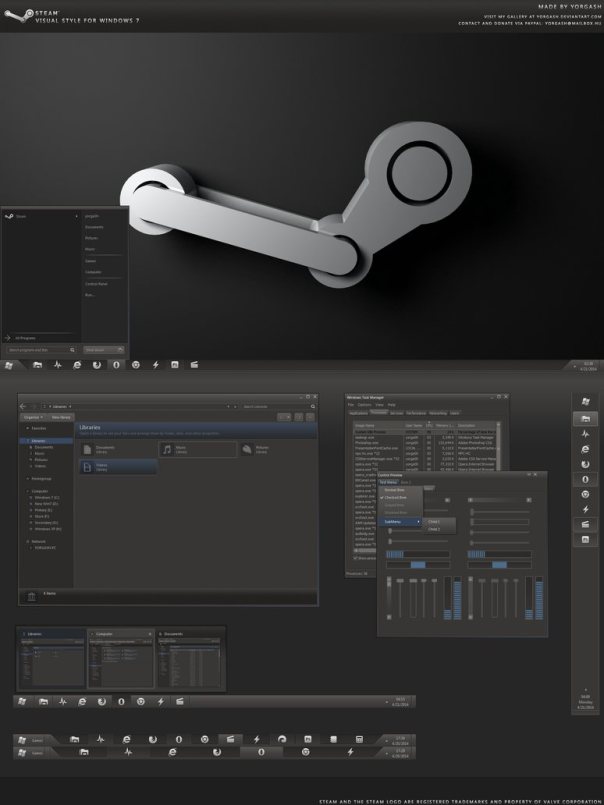
    5.  Steam OS Theme for Windows 8 and 8.1

    Steam OS Theme For Windows 8 and 8.1
    Steam OS Theme For Windows 8 and 8.1

    Download Steam OS Theme


    That,s it, After downloading your desired theme, extract the downloaded zip file and read the readme file present inside that zip for installation instructions.

    Please comment with your Feed backs and queries.

    Password Protect Folders in Windows Without any Software

    There are hundreds or maybe thousands of third-party software available on the internet for protecting Files and Folders in Windows with Password, but the main problem with them is that first we need to download them and after that, we need to install them and they even corrupts or deletes our files when we uninstalled them.

    So, today I am sharing this amazing trick with notepad through which you can Password Protect any Folder in Windows PC and you can even use this as a portable locker.

    How to Password Protect any Folder in Windows?

    This method works on every version of windows including Windows 8.1 and XP and will also gonna work on Windows 9.

    Step 1:- Firstly Create a new folder that will include your Password Protected Folder, in my case i Created a new folder on the desktop and named it “My Files”.

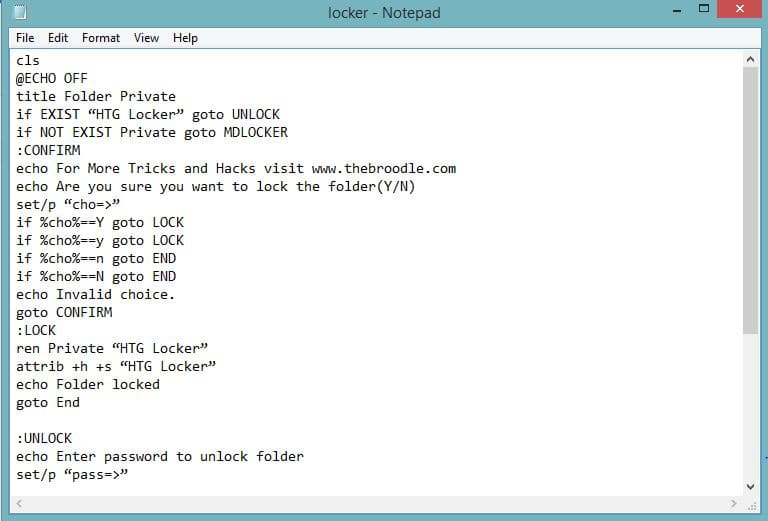
    Step 2:- Now open Notepad and paste the below code in it.

    cls
    @ECHO OFF
    title Folder Private
    if EXIST “HTG Locker” goto UNLOCK
    if NOT EXIST Private goto MDLOCKER
    :CONFIRM
    echo For More Tricks and Hacks visit www.TheBroodle.Com
    echo Are you sure you want to lock the folder(Y/N)
    set/p “cho=>”
    if %cho%==Y goto LOCK
    if %cho%==y goto LOCK
    if %cho%==n goto END
    if %cho%==N goto END
    echo Invalid choice.
    goto CONFIRM
    :LOCK
    ren Private “HTG Locker”
    attrib +h +s “HTG Locker”
    echo Folder locked
    goto End

    :UNLOCK
    echo Enter password to unlock folder
    set/p “pass=>”
    if NOT %pass%== PASSWORD_GOES-HERE goto FAIL
    attrib -h -s “HTG Locker”
    ren “HTG Locker” Private
    echo Folder Unlocked successfully
    goto End
    :FAIL
    echo Invalid password
    goto end
    :MDLOCKER
    md Private
    echo Private created successfully
    goto End
    :End

    Password Protect Folders in Windows With Notepad Script
    Password Protect Folders in Windows With Notepad Script


    Step 3 :-
    Next Change the “PASSWORD_GOES_HERE” from the above code with your desired password.

    Step 4 :- Now Save the notepad file as “locker.bat” in the folder you created (You will need to select “All Files” in Notepad’s saving window in order to save the file as .bat file instead of .txt)

    Step 5 :- Now double click on the “locker.bat“, it will create a folder named “Private” in your Folder.

    Step 6 :- Now Paste those files and folders that you want to be protected in “Private” folder.

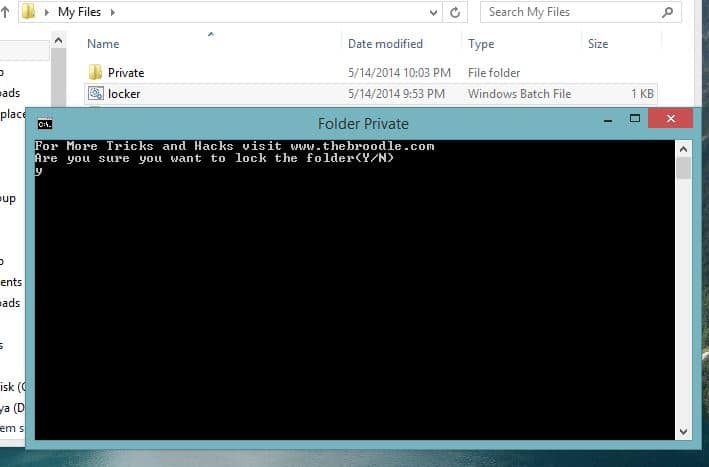
    Step 7 :- After pasting all files and folders double click on “locker.bat” now this time it will ask for the permission that you want to lock the folder, type “y” and hit enter.

    Lock Folders in Windows With Password withot any software
    Lock Folders in Windows With Password withot any software

    Step 8 :- That’s it, now you will see that the Private folder disappears, now if you want to unlock it just double click on locker.bat and type your password and hit enter.

    That’s it, you can use this method to lock any amount of files and folders.

    Do share your feed backs and queries in comments.

    Use Google Chrome Without Mouse With Keyboard Shortcuts

    3

    Many times we stuck on the situations when our Mouse stops working or gets broken, in that situation, it’s very hard to use any software in windows with keyboard, especially browsers like Google Chrome.

    So, today I am sharing this post which contains a list of all Google Chrome Shortcuts through Which you can easily use Chrome without Mouse.

    Below is a list of keyboard shortcuts that can be used in Google Chrome for Windows. These shortcuts can be utilized for a variety of purposes, ranging from opening Chrome’s internal Task Manager to sending the active Web page to your printer.

    Must Read: How to Use Google Chrome Without Mouse in 2020

    Controlling Tabs:-

    • CTRL + T: Open a new Tab
    • CTRL + W: Close current tab or pop-up window
    • CTRL + F4: Close current tab or pop-up window
    • CTRL + <Link>: Open a link in a new tab
    • CTRL + SHIFT + T: Reopen the last tab that you closed
    • CTRL + 1:  Go to the Number 1 Tab in Position
    • CTRL + 2: Go to the Number 2 Tab in Position
    • CTRL + 3: Go to the Number 3 Tab in Position
    • CTRL + 4: Go to the Number 4 Tab in Position
    • CTRL + 5: Go to the Number 5 Tab in Position
    • CTRL + 6: Go to the Number 6 Tab in Position
    • CTRL + 7: Go to the Number 7 Tab in Position
    • CTRL + 8: Go to the Number 8 Tab in Position
    • CTRL + 9: Go to the Last Tab in Position
    • CTRL + TAB: Switch to the next tab
    • CTRL + SHIFT + TAB: Switch to the previous tab
    • CTRL + PAGE DOWN: Switch to the next tab
    • CTRL + PAGE UP: Switch to the previous tab

    Controlling Window or Page:-

    • ALT + F4: Close current window
    • ALT + HOME: Open your home page
    • F5: Reload the current page
    • ESC: Stop the current page from loading
    • CTRL + F5: Reload the current page, overriding the cache
    • SHIFT + F5: Reload the current page, overriding the cache
    • CTRL + U: View source code of the current page
    • ALT + <Link>: Download link
    • CTRL + F: Open the ‘Find in page’ dialog box
    • CTRL + G: Find the next match from ‘Find in page’ box
    • F3: Find the next match from ‘Find in page’ box
    • CTRL + SHIFT + G: Find the previous match from ‘Find in page’ box
    • SHIFT + F3: Find the previous match from ‘Find in page’ box
    • CTRL + U: View source code of the current page
    • CTRL + D: Bookmark the current page
    • CTRL + PLUS: Make text larger
    • CTRL + MINUS: Make text smaller
    • CTRL + 0: Return to default text size
    • BACKSPACE or ALT + LEFT ARROW: Advance to the previous page in your browsing history (for the current tab)
    • SHIFT + BACKSPACE or ALT + RIGHT ARROW: Advance to the next page in your browsing history (for the current tab)
    • CTRL + S: Save the current page to your hard drive
    • CTRL + C: Copy selected text or images to the Clipboard
    • CTRL + V or SHIFT + INSERT: Paste the current contents of the Clipboard, preserving original formatting
    • CTRL + SHIFT + V: Paste the current contents of the Clipboard without original formatting

    URL and Address Bar Shortcuts:-

    • CTRL + ENTER: Automatically add www. (at the beginning) and .com (at the end) of the text currently residing in the Address (or URL) bar
    • CTRL + BACKSPACE: Remove whatever key term precedes the active cursor in the Address (or URL) bar
    • CTRL + L or ALT + D: Highlight the full URL in the Address bar
    • CTRL + K or CTRL + E: Enters a question mark in the Address bar. Typing a keyword or keywords following this question mark will submit the search term to your default engine.

    Other Important Shortcuts:-

    • CTRL + SHIFT + M: Launches Avatar Menu / Profile Management
    • CTRL + O: Open a file in the browser
    • CTRL + H: View Browsing History
    • CTRL + B: Toggle bookmarks display
    • CTRL + J: View Downloads
    • SHIFT + ESC: View Chrome’s internal Task Manager
    • CTRL + P: Print the current page
    • CTRL + D: Bookmark the current page
    • ALT + E or ALT + F: Open Chrome’s “wrench”, or tools, menu
    • CTRL + SHIFT + B: Activate or disable the Bookmarks Bar.
    • F6 or SHIFT + F6: Advance through active components on the current page, or through items in Chrome’s Address bar, Bookmarks bar, or Downloads bar.
    • CTRL + SHIFT + J: Open Chrome’s JavaScript Console.
    • CTRL + SHIFT + I: Open Chrome’s Developer Tools interface.
    • F1: Open Chrome’s Help Center in a new tab or window.
    • CTRL + SHIFT + DELETE: Open the Clear Browsing Data window.

    That’s it, Now Use these Shortcuts and Start Using Google Chrome like a Pro.

    Installing ADB and Fastboot in Windows Without Android SDK

    Any user who uses Android Devices as Power User must have come across ADB and Fastboot commands.

    Today i am posting this tutorial through which you can install ADB and Fastboot in your Windows PC without Downloading the Whole Android SDK.

    How to Install ADB and Fastboot:

    Step 1 :- Firstly Download the latest ADB Installer from the below link.

    Download ADB Setup from XDA Forums

    Step 2 :- Now after downloading Right Click on adb-setup-1.1.exe and chose “Run as Administrator“.

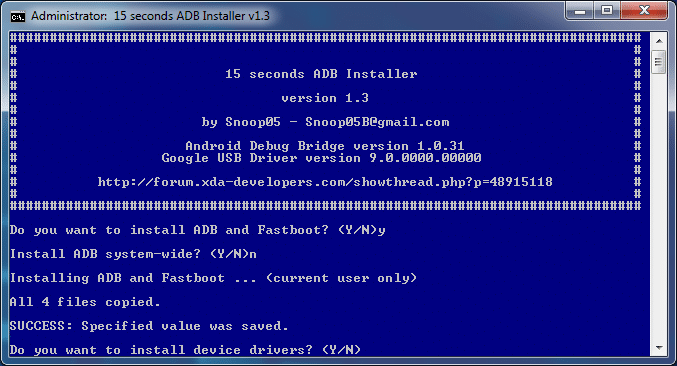
    Step 3 :- It will open a command prompt windows with blue background and will ask for “Install ADB and Fastboot?”, hit Y and Enter.

    Step 4 :- Next it will ask to install drivers for your device, choose “Y” if you haven’t install device drivers or “N” if you already have installed Device drivers.

    ADB and Fastboot Installer
    ADB and Fastboot Installer

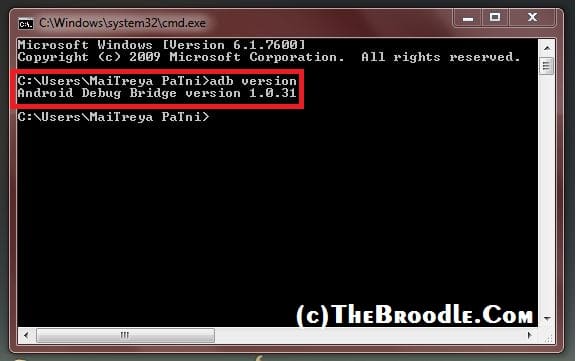
    Step 5 :- Wait for few seconds till it finishes, to verify you have successfully installed ADB and Fastboot, open command Prompt (Win+R and type cmd in run dialog) and type “adb version” (without quotes) if it returns something like “Android Debug Version x.x.xx”  then your adb and fastboot are successfully installed.

    Android Debug Bridge Version
    Android Debug Bridge Version

    If you face any problem during this whole process then please comment.

    Best Way to Hide Files and Folders in Android Without Any App

    There are many apps in Google Play Store Which hides files and folders from your device but the main drawback of these 3rd Party apps is that they only hides files and folder till we have them install after uninstallation either those files and folder gets visible or gets deleted.

    Today i am sharing this little tutorial through which you can hide any file or folder without any app just with your file manager.

    Hide Files and Folders in Android without any App:

    Step 1: Firstly open File Manager on your Android Device.

    Step 2: Now Browse to the file or folder that you want to hide, for example, i wanted to hide folder “Videos” in my phone.

    Step 3: Next, just rename that file or folder and add “.” (full stop without Quotes) in front of its name, so it will make something like “.Videos“.

    Step 4: That’s it, now your Android device will not recognize that folder and will stop showing it in your device.

    Step 5: Now if you want to make it visible then just remove . from the name and it will start showing up.

    So, this was the working trick for hiding files and folder and it works on all devices, if you have any other trick then please comment below.

    How to Hide Last Seen from Facebook Chat and Messages

    Facebook and WhatsApp both have same feature of showing Last Seen in Chat and Messages, however newer version of WhatsApp has a button that disables Last Seen Feature but as Facebook don’t have any button like that, i am showing you a little guide to hide last seen from Chats and Messages.

    There is app on Facebook named -“Unseen-App”, it enebles you to hide Last Seen from Messages and Chats.

    This App doesn’t require any Specific Browser as its Facebook App its always connected with your Facebook Account and it even work when you login from different devices.

    Hiding Last Seen Using Facebook Unseen App :-

    Hide Last Seen from Facebook
    Hide Last Seen from Facebook

    Step 1 :- Firstly Login to your Facebook Account.

    Step 2 :- Now install the Unseen App in your Facebook Account and grant any permission asked.

    Step 3 :- That’s it after your app is installed you can see your last seen time stamp is hidden to other person. Now you do not need to be afraid of your last seen status being broadcasted to anyone chatting with you as its totally protected.

    How to Play Any UnSupported Game on PC Without Graphic Memory

    There are many games which requires High Graphic Memory to be played, since many of us don’t have High Memory Graphic Card its impossible to play those games in PC, but with the help 3D-Analyzer you can easily play any game on your PC even the game is unsupported.

    What is 3D – Analyzer?

    Basically 3D Analyzer is simple tool which utilizes you PC’s Ram and uses it as a Graphic Memory, Suppose you have 1GB Ram installed in your PC, then this tool will acces about 128 MB as a Graphic Memory and keep the rest as normal RAM.

    How to use 3D- Analyzer :-

    To use 3D- Analyzer just follow the below steps :-

    Step 1 :- Firstly download 3D- Analyzer from the below link

    Download 3D- Analyzer

    Step 2 :- Now extract the downloaded zip and run .exe file.

    Step 3 :- Now Open the tool and Click on Big “Select” Button and select the Game .exe file. (Make Sure to nevigate to gave directory and select the .exe file of that game)

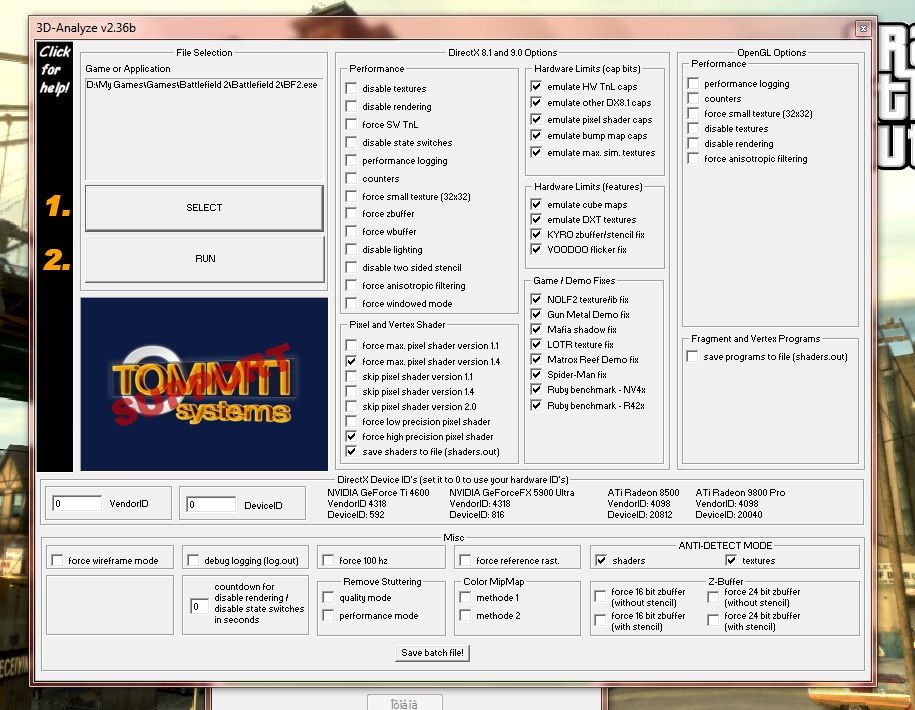
    Step 4 :- Now make sure to tweak setting just like mentioned in the image below, select every check box like below mentioned image.

    3D Analyzer Settings
    3D Analyzer Settings

    Step 5 :- Next, after configuring hit the Run Button and see you Game Starts.

    You can also change settings by your desire if the games not starts.

    Best Roms for Micromax Canvas 4 A210 (Collection of Stable Roms)

    Hello everyone, today i am sharing a list of best canvas 4 Roms with you, these Roms are tested and almost are bugless.

    So, before going further please make sure that you have Successfully rooted your Canvas 4 and install CWM recovery, if you don’t then follow the guide for rooting and installing CWM from below link :-

    List of Best Canvas 4 Roms :-

    Just click on any Rom Name to visit its Thread on XDA Forums

    Rom NameRom base
    MicroNote RomSamsung Galaxy Note 3
    KRom V1Samsung Galaxy Note 3
    KitKatAndroid 4.4 KitKat
    Pranjal’s RomJelly Bean 4.2.1
    MIUI IndiaMIUI
    Lewa OSLewa
    Stock Rom V.2Stock Canvas 4
    Speed V2Sony Xperia C
    Canvas 4 TurboMicromax Canvas Turbo A250

    I, will update this post with more Roms, so keep visiting and please do comment if you know any other Rom.

    Micromax A106 Specs – First MMX Device Running KitKat Android 4.4

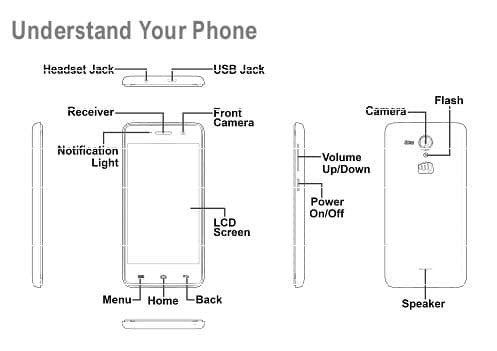
    Recently User Manual of Micromax A106 got leaked on the internet.

    The Manual shows that Micromax is planning to launch its first Android 4.4 KitKat running Device “Micromax A106”.

    Going by the manual we can fore know about the sensors which it can have like gravity or proximity. It is a DUAL SIM phone with some expected features like Bluetooth, WiFI, GPS, 3G, front camera mated with rear camera etc. The new Micromax A106 includes removable battery and MicroSD card slot to expand the memory. Though nothing much have been said about the camera, display or battery capacity front.

    The specs that reveled through the User Manual were :-

    • Android 4.4.x KitKat
    • Dual Sim
    • Gravity Sensor
    • Proximity Sensor
    • WiFi
    • 3G
    • Bluetooth
    • GPS
    • MicroSD Support
    • Removable Battery

    Below are Screenshots of the manual where it was mentioned that MMX A106 will be running Android 4.4 KitKat.

    Micromax A106 Running KitKat
    Micromax A106 Running KitKat


    Micromax A106 Device Design
    Micromax A106 Device Design

    Micromax A106 Android 4.4 KitKat Device
    Micromax A106 Android 4.4 KitKat Device

    You can download the leaked Micromax A106 User Manual from the below link :-

    Micromax A106 User Manual PDF


    Automatically Detect and install Custom Recovery on any Android Device

    0

    Installing a Custom Recovery like ClockWorkMod, TWRP, etc is lengthy task specially for beginners, fot this first of all we have to find supported recovery and then we take backup and then we flash it.

    It consumes lots of time and resources, but now today i am going to share an awesome app which makes this task easier and faster.

    There is an app available in Play Store named “Rashr – Flash Tool”, this app enables a rooted user to flash Custom CWM, TWRP or Philz Recovery images on any device automatically by automatically detecting the device ID, it also tales backup of Stock recovery before installing a custom one.

    Rashr – Flash Tool :-

    This app requires that you have a rooted device.

    Rashr – Flash tool flashes and backups your device recovery and kernel without rebooting it very fast and easy without a PC or any outside influence.
    This app have over 1500 build-in recovery IMGs (ClockworkMod/TWRP/PhilZ) of course you can choose other IMGs from internal and external storage.
    Over 90% of all devices will be supported by the App.

    Rashr - Flash Tool for Custom Recoveries
    Rashr – Flash Tool for Custom Recoveries

    Features :-

    • Over 1500 Build-in Recoveries (ClockworkMod/Touch, Team Win Recovery Project and PhilZ-Touch)
    • Flash Kernel and Recoveries without PC
    • Flash already downloaded IMGs from internal and external storage
    • Backup Kernel and Recovery IMGs without PC
    • Full command logging for more control what this App is doing
    • Ads can be disabled from settings.
    • Free full app without Ads and any restrictions

    Downloads :-

    Download Rashr – Flash tool from Google Play Store :-

    Download Rashr – Flash Tool from Play Store

    That’s it folks! Enjoy Flashing Custom Recoveries. If you cannot find recovery for your device that try searching for it on XDA Forums.

    Please comment with your suggestions and queries.