If this is the first time you’ve done this task, learning how to migrate a WordPress site can be a big task, but in fact, the process is much simpler than it seems. As businesses and websites continue to grow, they are increasingly demanding their hosts, and sometimes this means that your site needs to move to a larger space in order to scale.
Often, the web designer who originally created the site has moved to other projects and is too lazy to move the site for you, allowing him to make some decisions—find a host that provides migration services, hire a professional, or perform surgery on the site himself.
How to Migrate a WordPress Website?
While hiring a professional is a sure way to get things done, you should try to learn how to migrate your WordPress site, or you will spend your hard earned money. why? Because the migration process is likely to occur multiple times, and this is also a good, worthwhile skill.
1. Back up website files
2. Export the database
3. Upload the website files
4. Create a database at the destination
5. Import the database
6. Fix wp-config.php
Let’s walk through all of these required steps to learn how to quickly and easily you can migrate a WordPress site.
1. Back up Website Files
First, we must retrieve your website files from the original host. We will use the File Transfer Protocol (FTP) to download them to your local computer. If you don’t already have a favorite FTP client, we will use FileZilla.

This process can take some time depending on the number of plugins installed and the number of uploaded files. Once the transfer is complete, you can proceed to the next step: copy the database.
If you have cPanel powered hosting then you can also use the cPanel file manager to make a zip of all your website files and download the zip file into your computer.
2. Export the Database
The database is the most important part of the WordPress site – it is like the brain, hosting all your pages and articles. Surprisingly, copying is also the easiest. Most hosts provide access to the database via phpMyAdmin.
Simply log in to your host control panel and access phpMyAdmin.

Select the database for your website in the left column and click Export in the top menu bar.

The export method should default to fast, which is acceptable for these purposes. You will also want to make sure the format is SQL. This will ensure that your backup is generally accepted for MySQL.

Then you will click Next and you will be prompted to download the .sql file. Move this file to the same folder as your website to track it when the migration is complete.
3. Upload Website Files
Now that we have copied the site, we can back up the site files in the same way we used to upload them to the destination host.
Log in to the destination account using FileZilla and browse to the web root of the destination host account. If you are using cPanel, it is usually a public_html/ folder.
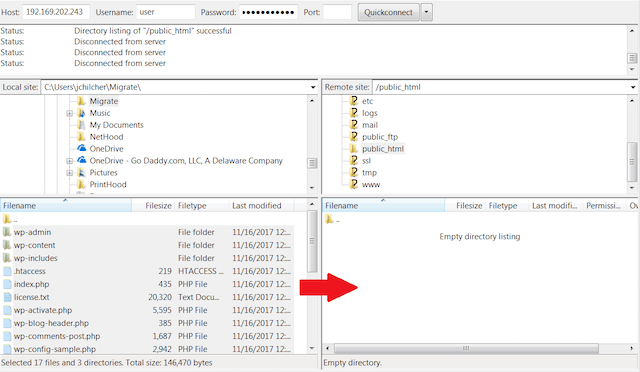
Then, drag and drop your website files from your local computer to the web root of the new host. This process can take some time depending on the size of the uploaded file and the size of the plugin.
You can also use the cPanel file manager to upload the zip file of your website files and then extract it via the file manager itself.
4. Create a Database at the Destination
Before you migrate your database to a new host, you must first create an empty database.
Log in to the control panel of the destination account. If you are using cPanel, you are looking for a MySQL® database.

Create a new database and name it a website that’s right for you.

Once the database is created, create a new database user, then add the new user to the new database and have all its privileges. Make sure to record the database name, username, and password – you will need them later.

If you are facing issues while creating the database or assigning the user with permission to it then alternatively you can also use the MySQL Database Wizard from cPanel to create your database.
5. Import the Database
Once the database is set up, we can import the database. This step is similar to how you exported the database before.
Log in to phpMyAdmin on the destination account and click on the name of the new database you just created. Then click the Import button in the top menu bar.

As before, you won’t need to change any settings – just click the Browse button and select the .sql file you generated earlier.

Click Next and the database will begin the import process. Depending on the size of your site, this process can take a while to complete.
If you face error while uploading the database due to size restrictions you need to modify the php.ini file and increase the size limits.
6. Fix wp-config.php File
We have successfully moved all of your data, but the site has not been properly loaded on the new host. Now we will modify the wp-config.php file to put the file and database together.
You can edit this file in FileZilla by right-clicking and selecting Edit (cPanel also provides a file manager that can edit the file). What you are looking for is the following settings in the file:


Get the database information you recorded earlier, and then replace the old database information in those lines with the new one.

At this point, if the domain name remains the same and the DNS is set up during the migration process, then your site should be working properly. However, there may be some different scenarios that can make you unsuccessful.
Finishing Work
Now, there are some small details that may prevent your migration from completing.
Domain Name Change
If the domain name of your website has changed during the migration process, the site URL and home page URL will need to be changed to reflect the new domain name. You can do this by adding the following line to the wp-config file and replacing the text “example.com” with your domain name:
Define(‘WP_HOME’,’http://example.com’);
Define(‘WP_SITEURL’,’http://example.com’);
DNS Change
If the domain name is the same after the migration is complete, then you only need to change the A record of the domain name to point to the IP address of the new hosting account. Depending on the registrar, this process will be different, so it’s best to know how to do this with your domain name provider.
In Conclusion
Congratulations! You have successfully mastered the migration process for a WordPress site. You can save the website files and databases to this folder on your local machine and save them in a safe place, as it can now be used as a backup for your website, just in case.
Keep in mind that all sites are different at build time. Sometimes, if your site is more complex, you may need to take additional steps. Keep practicing. Remember, you can always take a step back and try again.
Thank you for reading the article, you can share your questions or opinions in the comments below.