If you are a gamer then you probably have heard about the Valve’s “Steam” OS – An Operating System designed specially for Gamers. Steam OS is a Linux based Operating System designed for people who wanted to enjoy High End Graphic Games in their PC.
The installation process is pretty easy if you follow the steps as i do. So, lets begin installing Steam OS.
System Requirements for Steam OS :-
- Windows XP, Vista, or 7
- 512 MB RAM
- 1 Ghz or faster processor
- Intel Mac, OS X version Leopard 10.5.8, Snow Leopard 10.6.3, or later.
- Two-button mouse strongly recommended
- 1GB HD space (recommended)
- Internet connection (broadband recommended)
Downloads :-
Before installing you need to download some files and softwares, so download them from the below links :-
Steam OS :-
Direct Download link for Steam OS DVD ISO File
Download Steam OS ISO FileIf the above link is not working or expired then you can download latest version from here.
Oracle VM Virtual Box :-
Download Virtual Box Setup from the below link for your OS.
Download Oracle Virtual Box SetupInstallation Instructions :-
Follow this step by step Installation Guide for installing on Virtual Box.
Step 1 :– After downloading Both of the above files, Install Virtual Box on your PC and run it from desktop.
Step 2 :-On the next screen you will get Virtual Box Main Screen, Click on “New” Blue colored button from the top left side on the screen.
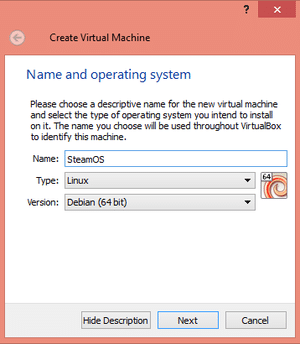
Step 3 :– On the first screen, you will be asked pick a name for your system and to choose what type of operating system it will run. Pick whatever you want for a name, and choose Linux from the type dropdown menu and Debian (64 bit) from the version list.

Step 4 :– On the next screen you’ll choose how much of your system memory the virtual computer will use while running. Choose less than half of your total system memory—one or two gigabytes should be fine.
Step 5 :- Next you’ll be asked about a hard drive. Choose to create one now, and then on the next screen, leave the first option (VDI) selected, and click Next.
Step 6 :- On the next screen, leave the Dynamically Allocated box checked and hit Next again. Finally, you’ll be asked to pick a size for your virtual machine’s hard drive. Note that you won’t actually be giving up all this hard drive space right away—the dynamic allocation option you selected earlier means that virtual hard drive space is only created as you actually use it. The amount you specify here is just the maximum amount the virtual machine will ever be allowed to use. So go ahead and pick a fairly large value, such as 40 or 50GB. (it may be less depending on your system hd space)
Step 7 :-With that, your virtual SteamOS machine is created—you can see it in the column on the left side of VirtualBox, Now Select it and click on “Start” Button to Start it.
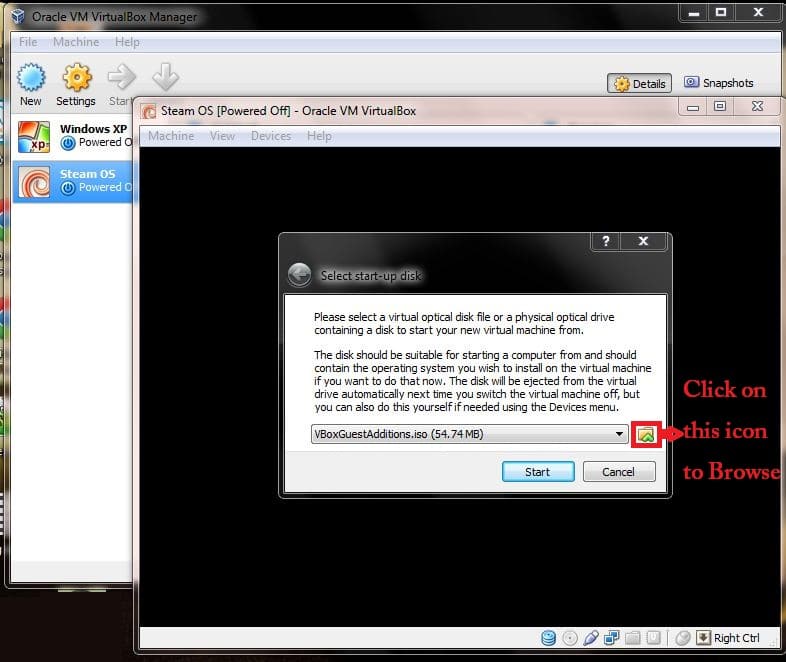
Step 8 :- After clicking on Start button it will ask for start up disk, to install the OS, just browse the iso file that you downloaded by clicking on the folder icon next to drop down list and click on start button.

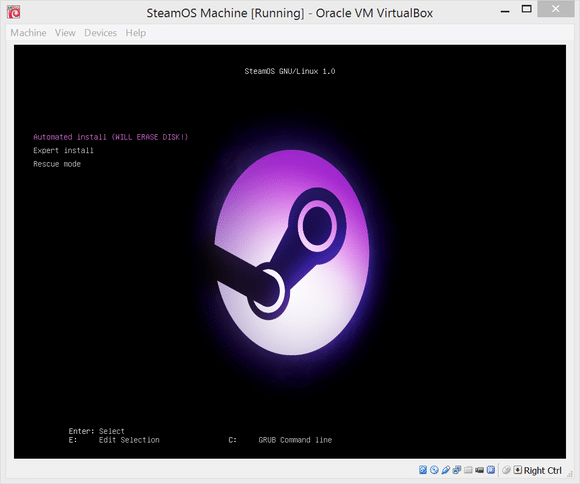
Step 9 :- After clicking on start button you will see that Steam OS is Starting and within few minutes you will get start screen which shows Installation options.

Step 10 :- Now Click on Automatic Install and follow on screen options. That’s it, you will get your Steam OS Installed withing few minutes. For Step by Step guide after Step 10 visit this link.

