Official Windows 10 for Raspberry Pi 2 Model B
On 29th July this year Microsoft has officially released its most awaited OS Windows 10 for general public and with its support for multiple single-board computers it is now officially available for Raspberry Pi 2 Model B as Windows 10 IoT, however early preview builds of Windows 10 were already on the web for pi but this time its official retail build and is available absolutely for free.
What is Windows 10 IoT?
IoT stands for Internet of Things (IoT) which brings together devices, sensors, cloud, data and more. Windows 10 IoT Core is a new edition for Windows targeted towards small, embedded devices that may or may not have screens. For devices with screens, Windows 10 IoT Core does not have a Windows shell experience; instead you can write a Universal Windows app that is the interface and “personality” for your device. IoT core designed to have a low barrier to entry and make it easy to build professional grade devices. It’s designed to work with a variety of open source languages and works well with Visual Studio.
How to install Windows 10 IoT in Raspberry Pi 2 Model B?
Installing Windows 10 on Raspberry Pi is pretty easy, it is even easier then installing Windows on a normal PC, so before proceeding further make sure that you have things list below ready.
Things that you will need :
- A Raspberry Pi 2 Model B
- Micro SD Card of at least 8GB
- A normal PC running Windows 10 (as the official software provided by Microsoft for burning Windows 10 IoT ISO on SD Card only supports Windows 10, Windows 10 Insider Preview will also work)
- Internet connection on PC
1. Burning Windows 10 IoT ISO to SD Card :
Step 1 : Download the Windows 10 IoT ISO from the Microsoft Download Center using the below button.
Download Windows 10 IoT ISO for Pi
Step 2 : Make sure that you are on Windows 10 (any build) and then double click on download ISO file, it will automatically mount itself as a virtual drive so that you can access its contents.
Step 3 : In that mounted ISO you will find “Windows_10_IoT_Core_RPi2.msi” file, install it.
Step 4 : After installation open “IoTCoreImageHelper.exe”, search for it on start menu.
Step 5 : After it opens it will display a windows as shown below.
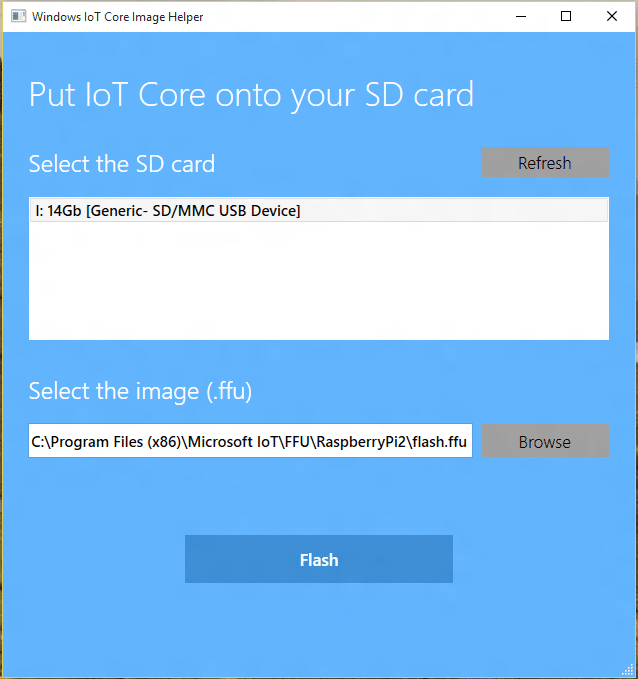
Step 6 : Next insert a Micro SD card of at least 8 GB in your system, hit the refresh button on the Windows IoT Helper windows and select the SD Card as shown above.
Step 7 : Next select image .ffu file, it is located inside the Program Files directory under Microsoft IoT folder, see the above image, select the ffu file and click on flash button to begin the process of burning the Windows 10 image on your SD Card.
Step 8 : Wait till it flashes after that eject your SD card from your system, its now ready with Windows 10 IoT.
2. Hook up your Raspberry Pi
Step 1: Insert the newly burned SD card in your Raspberry Pi in its SD card slot.
Step 2: Connect a network cable to the Ethernet port.
Step 3: Connect a screen with HDMI slot.
Step 4: Finally connect to power supply and turn it on.
3. Boot up Windows 10 in Raspberry Pi
Step 1: After following the above steps successfully your Raspberry Pi 2 Model B will automatically boot up with Windows 10.
Step 2: On the very first boot Windows 10 IoT will do some first boot configurations and it will display a default blue colored application while this is happening. Wait for a few minutes and the Pi will automatically restart. This will happen only once and then DefaultApp should come up, displaying the IP address of the Raspberry Pi 2.
Step 3: That’s it, use that ip to start accessing your Windows 10 on Raspberry Pi 2
If you face any problem during this tutorial then feel free to comment, also leave your suggestions below.
For More tutorials like this Subscribe to our Mailing List below.