As you might have already heard the WordPress Platform, it is one of the most popular and most used blogging platform and is available for free, We can install WordPress on our Server with database connectivity and we can also install it on our PC with some third party software like Xampp.
But have ever thought that WordPress can be installed on a portable USB Pen Drive, yes it can be done.
I am posting this step by step tutorial so that you can install WordPress on a USB Device and can view your site from any PC. So, let’s start.
Things You Need:-
- A USB Pendrive of atleast 1GB
- Working Internet Connection
- A Windows PC
- A little bit on Mind
How to Install WordPress on a USB Pendive :
Installing XAMPP on a USB :-
Step 1 :- Firstly download XAMPP Lite Portable Version from the below link. (XAMPP is a software package containing Apache web server, PHP, MySQL, and phpMyAdmin)
Step 2 :- Once you have downloaded the XAMPP portable file, you need to double click on the file to run the installation. During the installation you will be asked to select the location where you want to install XAMPP. You need to click on the folder icon, and then select your USB drive.
Step 3 :- Click on next to continue the installation and follow the install wizard till it finishes.
Step 4 :- After the installation completes, go to your USB drive and then open the XAMPP folder.
Step 5 :- To launch XAMPP, you need to run xampp-control.exe from your USB drive. This will bring up the XAMPP Control Center on your screen.
Step 6 :- Now start Apache web server and MySQL by clicking on the start button next to them. You will be prompted by Windows Firewall, just allow both the applications.
Step 7 :- Next open a web browser and type http://localhost/ in the address bar. You will be greeted by the XAMPP splash screen. This means that you have successfully installed XAMPP on your USB drive and you can use it on any PC.
Installing WordPress :-
Step 8 :- Now download latest version of WordPress by clicking on the below link.
Step 9 :- Now open your USB drive and go to the htdocs folder in your XAMPP installation directory. Create a new folder in the htdocs. This folder will be your local WordPress site. You can name it anything that you like. For the sake of this tutorial let’s name it wordpress.
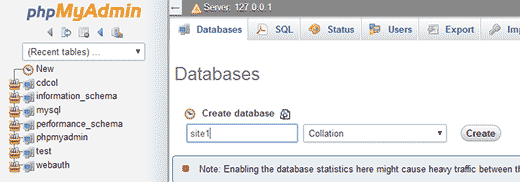
Step 10 :- Now open your web browser and enter http://localhost/phpmyadmin in the address bar. This will open phpMyAdmin which is a web based database management software. Now you need to create a database for WordPress to create Click on the Databases on the top menu bar, and then provide a name for your database before hitting the Create button.
Step 11 :- Now Extract the downloaded WordPress zip on your desktop and open it.
Step 12 :- Now copy the contents of that extracted folder and paste them into the /htdocs/wordpress folder on your USB drive.
Step 13 :- Once you have copied WordPress files, you need to run the WordPress installation by accessing your site at http://localhost/wordpress in a web browser.
WordPress will inform you that it didn’t find the WordPress configuration file, so you need to create one by clicking on the Create a Configuration File button.
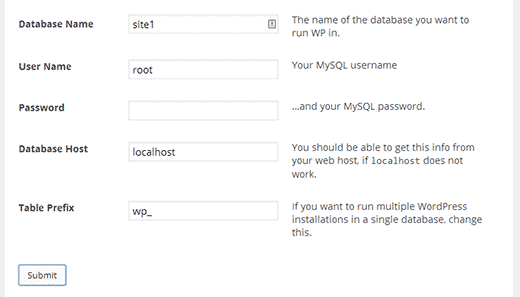
Step 14 :- On the next screen, provide the database name you created earlier. In the username field you need to enter root, and leave the password field blank. Hit the submit button to proceed.
Step 15 :- WordPress will now try to connect to your database. Upon success, it will show you a success message. Click on the Run Install button to proceed installing WordPress.
Step 16 :- That’s it, it will install the WordPress and in the end it will ask for general details like site name, username and password just fill them up.
Now you can run your WordPress site from any computer just by entering http://localhost/wordpress in the browser.
If you face any problem then please comment below.